Crochet Puff Beret Hat
Explore the world of handmade fashion with this stylish beret hat featuring a unique crochet puff design. This trendy accessory is perfect for adding a touch of flair to any outfit, whether you're heading out for a casual day or a special occasion. The intricate crochet work creates a cozy and textured look that is sure to turn heads wherever you go. Made with high-quality yarn, this beret hat is not only fashionable but also comfortable to wear, making it a must-have piece for your wardrobe. Whether you prefer a slouchy look or a more structured fit, this hat can be customized to match your style preferences. The puff stitches add a playful element to the classic beret silhouette, making it a fun and eye-catching accessory for any season. Handcrafted with love and attention to detail, this beret hat is a statement piece that will elevate your look and showcase your unique sense of style.
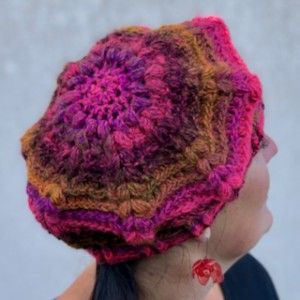
For this women/teenage size you will need:
YARN: Tosca from VLNIKA
100g, 290m, 100% acrylic, self stripping – 1/2 skein
The substitution: Red Heart Unforgettable, 100g/250m — 1/2 skein
The crochet hook 5.5 mm.
Size: bellow there is a pattern for woman size, the head measurement 22 inch / 56 cm, this one fits perfectly to me.
The beret can easily be adapted to a smaller size or bigger size just by making the starting chain longer or shorter.
Difficulty Level: Level 1 – Easy, for Beginners
US crochet term:
SlSt – slip stitch
CH/s – chain/s
SC – single crochet
HDC — half double crochet
SK — skip
T — turn
ST/s — stitch(es)
REP — repeat
YO – yarn over
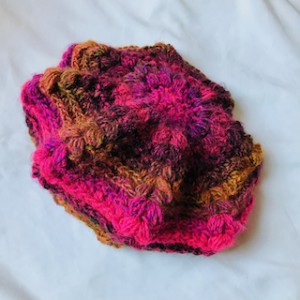
Special stitches used:
FRONT POST DOUBLE CROCHET AND BACK POST DOUBLE CROCHET STITCHES
front post double crochet (fpdc) and back post double crochet (bpdc)
Front and back post crochet stitches are used to create wonderful texture in crochet. Instead of making your stitch through the loops at the top of the stitch, you make it around the stitch. Everything else stays the same. The most challenging things about crochet post stitches are knowing where and how to insert the hook. There are front post stitches and back post stitches.
For front post double crochet stitches (fpdc): yarn over, insert your hook from front to back then from back to front around post of stitch indicated, yarn over, pull through stitch, then finish your double crochet as normal, yarn over, pull through 2 lps, yarn over, pull through last 2 lps
For back post double crochet stitches (bpdc): yarn over, you insert your hook from back to front then from front to back around post stitch indicated, yarn over, pull through stitch, then finish your double crochet as normal, yarn over, pull through 2 lps, yarn over, pull through last 2 lps
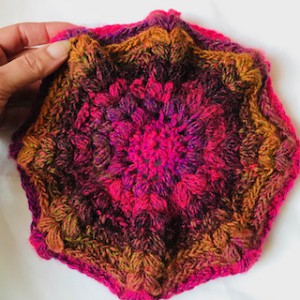
PUFF STITCH
Crochet puff stitch is essentially the same as crochet bobble stitch. However, bobble stitch is worked using stitches that are double crochet or taller.
Puff stitch is worked only using half double crochet stitches. Because of the unique third loop in hdc, it must be worked slightly differently than a regular bobble. Here are the instructions for a 3 hdc puff stitch:
Yarn over and insert the hook into the stitch where you are creating your puff stitch. Yarn over again and draw through. There will be three loops on the hook.
Repeat two more times. Each time adds 2 more loops to the hook. There will be 7 loops on the hook for a 3 hdc puff stitch.
Yarn over and pull through all loops on the hook.
Chain one. This step is used to secure the top of the puff stitch closed.
HDC IN 3RD LOOP
HDC in 3rd loop = the 3rd loop is hidden under the back loop.
This is my favorite crochet technique and I hope it will become one of yours soon too!
Crocheting in the 3rd loop of a hdc stitch pushes the top of the stitch forward so that the front and back loops of your stitch, which normally sit at the top are now visible at the front of the stitch. It creates a horizontal ridge of “v” shapes. It’s a way of adding a knit-look texture to scarves, blankets and shawls.
Pattern Notes
1) These pattern below is for adult women size, this can be easily adapted to a smaller size or bigger size just by reducing or increasing the numbers of stitches and as well as less or more numbers of rows. Remember that when making bigger hat size, you will need more yarn.
Adult Women Size:
Head measurement: 21.5 inch / 56 cm
Hat crown size: 7.9 inch / 20 cm
Hat measurement (the widest part): 10.6 inch / 27 cm
Hat part is 3.2 inch / 8 cm long
Hat Border is 4 cm / 1.6 inch long
2) This Hat is crocheted in rounds from the top down using half double crochet stitches.
3) A Ch 2 at beg of the row doesn‘t count as stitch
4) Work in continuous rounds
I love that French Beret and many people do so, they are classic and so popular!
HOW TO CROCHET PUFF FRENCH BERET HAT / WOMAN SIZE
WRITTEN PATTERN — ADULT SIZE
Make a magic circle.
Work in rounds
R1: ch2, 8 hdc in the ring. sl st in the 2nd ch from beg. (8 hdc in total)
We will do increasing in the next 7 rounds
R2: ch2, *2 hdc in next st * repeat around from * to * till end of round, sl st in the 2nd ch from beg (16 hdc around)
R3: ch1, *2 puff st between 2 st from previous round, 2 hdc between next 2 st from previous round * repeat from * to * till end of round, sl st in the ch from beg (2 puff st and 2 hdc between these 2 puff st groups)
R4: ch1, *2 puff st between 2 st from previous round, 1 hdc between puff st and hdc from previous round, 1 hdc in next 2 hdc in 3rd loop only, 1 hdc between hdc and puff st from previous round * repeat from * to * till end of round, sl st in the ch from beg (2 puff st and 4 hdc between these 2 puff st groups)
R5: ch1, *2 puff st between 2 st from previous round, 1 hdc between puff st and hdc from previous round, 1 hdc in next 4 hdc in 3rd loop only, 1 hdc between hdc and puff st from previous round * repeat from * to * till end of round, sl st in the ch from beg (2 puff st and 6 hdc between these 2 puff st groups)
R6: ch1, *2 puff st between 2 st from previous round, 1 hdc between puff st and hdc from previous round, 1 hdc in next 6 hdc in 3rd loop only, 1 hdc between hdc and puff st from previous round * repeat from * to * till end of round, sl st in the ch from beg (2 puff st and 8 hdc between these 2 puff st groups)
The measurement: 7.9 inch / 20cm
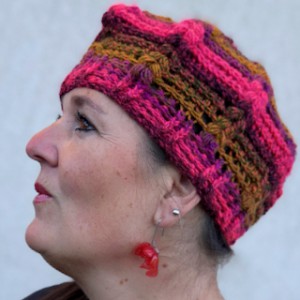
R7 — no increase
R7: ch1, *2 puff st between 2 st from previous round, 1 hdc in next 8 hdc in 3rd loop only* repeat from * to * till end of round, sl st in the ch from beg (2 puff st and 8 hdc between these 2 puff st groups)
R8 — R10: repeat R7
The measurement: 10.6 inch / 27 cm
Make sure you have the number of stitches in each round to make the hat big enough for woman head.
Decrease round
R11: ch1, *2 puff st between 2 st from previous round, skip 1 hdc, 1 hdc in next 6 hdc in 3rd loop only, sk 1 hdc* repeat from * to * till end of round, sl st in the ch from beg (2 puff st and 6 hdc between these 2 puff st groups)
R12 – R13: ch1, *2 puff st between 2 st from previous round, 1 hdc in next 6 hdc in 3rd loop only* repeat from * to * till end of round, sl st in the ch from beg (2 puff st and 6 hdc between these 2 puff st groups)
Decrease round
R14: ch1, *2 puff st between 2 st from previous round, skip 1 hdc, 1 hdc in next 4 hdc in 3rd loop only, sk 1 hdc* repeat from * to * till end of round, sl st in the ch from beg (2 puff st and 4 hdc between these 2 puff st groups)
R15: ch1, *2 puff st between 2 st from previous round, 1 hdc in next 4 hdc in 3rd loop only* repeat from * to * till end of round, sl st in the ch from beg (2 puff st and 4 hdc between these 2 puff st groups)
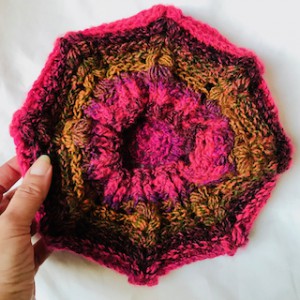
Border
It’s important to have multiples of 4 st. We have 48 st!
R16: ch2, 1 fpdc around puff st, 1bpdc around next 2 st *fpdc around next 2 st, 1 bpdc around next 2 st * repeat from * to * till end of round, sl st in the ch from beg
R17 – R20: ch2, *1 fpdc around next 2 st, 1 bpdc around next 2 st * repeat from * to * till end of round, sl st in the ch from beg
Measurement: 4 cm / 1.6 inch
Cut the yarn, weave in the ends. Lay your BERET the right side out and smooth down.
I would recommend you to wear your lovely French Beret