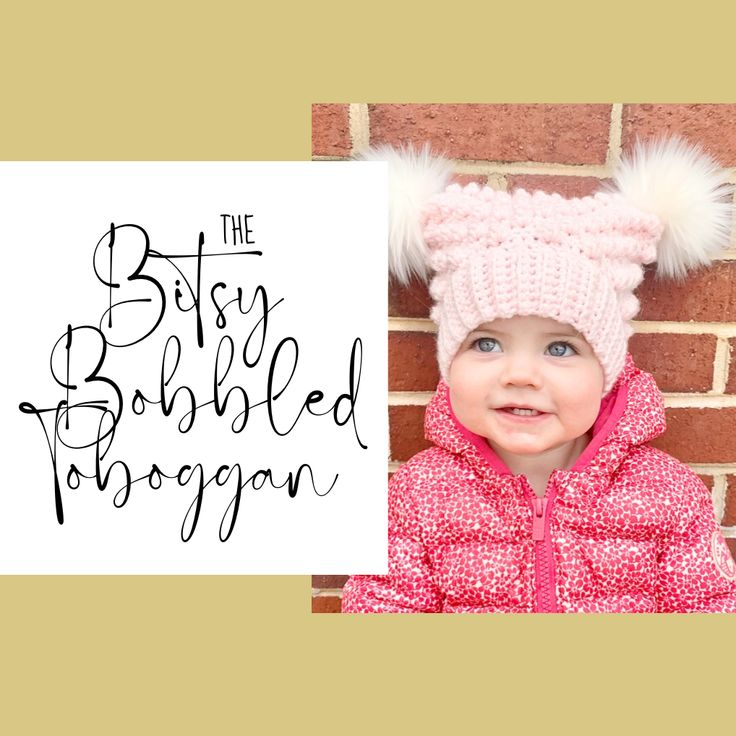
Crochet Winter Hat
Nothing beats the coziness and charm of a crochet winter hat! Whether you prefer a classic beanie or a funky pom-pom design, these handmade delights are sure to keep you warm and stylish all season long. From delicate stitches to vibrant yarn colors, there is a crochet hat out there to match every personality and outfit. So, why not add a touch of homemade love to your winter wardrobe with a cute and snuggly crochet hat? Trust me, your head and heart will thank you!
MATERIALS
HOOK(S) 5.0 mm • US size H
YARN Weight: Worsted
Hobby Lobby, I Love This Yarn Toddler: ~ 145 yards
NOTIONS
Scissors // Pom Pom Maker // Stitch Marker // Darning Needle // Measuring Tape
FINAL HEIGHT
Toddler: ~7.5 inches
*Note: Hat is meant to fit large and slouchy! Size down if you’d like a more fitted look.
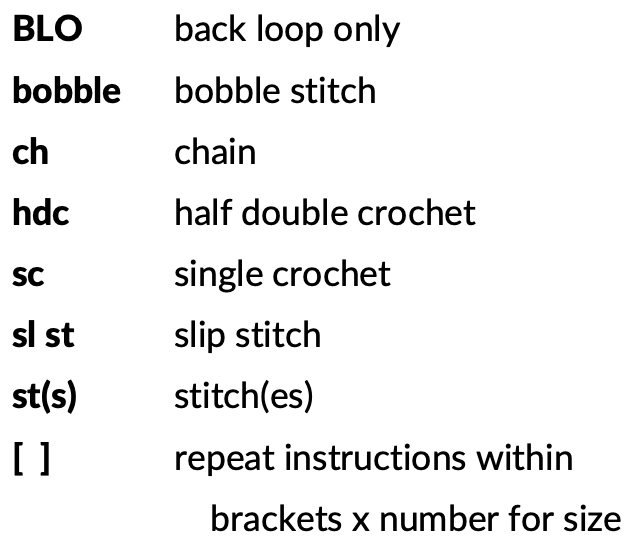
SPECIAL STITCHES
BACK LOOP ONLY (BLO):
To crochet in the back loop only, create your chain. Turn to go back across your work. You will notice the chains are in the shape of a “V.” As you go back across your work, place your single crochet stitches in only the back loop of the “V,” rather than through both loops. When you get to the end of your row, chain 1 and turn your work. As you go back across the work, continue to crochet only in the back loop. As you work the rows, you will begin to see they create a ridge-like effect. This will create your brim.
BOBBLE STITCH (bobble):
To make a bobble stitch, work four double crochets into the same stitch as below:
(Yo, insert hook into st, draw up a loop, yo, pull through first two loops on hook) and repeat 3 more times. End with 5 loops on the hook – yo, pull through all 5 loops.
GAUGE
Gauge is important for this pattern so that you don’t end up with a hat that is too small or too large for your intended size. If you find that your sample piece when attempting to meet gauge is too big, you will need to use a smaller hook size in order to create the intended size. If you find that your piece is too small to meet gauge, you will need to use a larger hook size in creating your hat to get the intended size. *Please note, I tend to crochet tightly! If you crochet loosely, you may need to size down in order to meet gauge. If you have trouble meeting gauge, read below under “before you begin” as adjustments to this pattern are fairly easy to give flexibility in sizing! Also, this hat is meant to fit pretty slouchy. If you prefer a more fitted look consider sizing down. If you finish and your hat just seems too big, consider omitting the last round of bobbles to decrease the final height of the hat.
Using an H (5.0 mm) Hook:
4 x 4 Square in Rows:
Row 1: Ch 17. Sc in the second ch and an additional 15 across. Ch 1 and turn.
Row 2+: Sc in the BLO x 16 across. Ch 1 and turn. Repeat for 18 rows total.
4.5 x 4.5 Square in Bobbles:
Row 1: Ch 17. Sc in the second ch and an additional 15 across. Ch 1 and turn.
Row 2: hdc x 16 across. Ch 1 and turn.
Row 3: sc, [bobble, sc x 3] x 3, bobble, sc x 2. Ch 1 and turn.
Row 4: hdc x 16 across. Ch 1 and turn.
Row 5: [sc x 3, bobble] x 3, sc x 4. Ch 1 and turn.
Rows 6-9: Repeat rows 2-5
Rows 10-13: Repeat rows 2-5
Row 14: hdc x 16 across.
Row 15: sc x 16 across. Cut yarn and fasten off.
BEFORE YOU BEGIN:
All sizes of hats begin by making the brim. You will work in rows on the brim and then will work in the round
for the rest of the hat. You will NOT join in the round. This might feel odd, but joining will affect the placement of the bobbles throughout the hat!
For the brim – if you have trouble maintaining gauge across the entirety of the brim when making rows, you may not reach the intended brim length as noted. Just add or subtract rows as necessary to reach the length in inches for your intended size. I can make a brim three different times and get three slightly different numbers! Aim to get close to the estimated length for your size. Also, be sure you don’t make your chains too tight when turning, as this will affect the “stretchiness” of your brim! For the hat – if you prefer a more fitted look or you are having trouble maintaining gauge, you can take out a few rounds at the end of the pattern to decrease the final height.
CREATING THE BRIM
Row 1: Ch 9. Sc in the second ch and an additional 7 back across. Ch 1 and turn. [8]
Rows 2+: Sc in the BLO x 8. Ch 1 and turn. [8]
Repeat x 57 more rows. Brim will have an estimated total of 59 rows. Continue to add if necessary!
Measurements: Height: 2 inches // Length ~13.5 inches
Fold your brim in half and sc 8 st across. Turn the brim.
WORKING THE HAT
Instructions are written in (toddler) size.
Stitch counts are included at the end of each round for each size. For the bobble rows, only the number of bobbles in that round for each size are included for the stitch count.
Round 1: Ch 1. You will now work in the round. You should be working on the outside of the brim. Sc x 60 around. [60]
Round 2: hdc x 60 around. [60]
Round 3: sc x 2, bobble, [sc x 3, bobble] x 14, sc. [15 bobbles]
Round 4: hdc x 60 around. [60]
Round 5: sc, bobble, [sc x 3, bobble] x 14, sc x 2. [15 bobbles]
Round 6: hdc x 60 around. [60]
Round 7: bobble, [sc x 3, bobble] x 14, sc x 3. [15 bobbles]
Round 8: hdc x 60 around. [60]
Round 9: [sc x 3, bobble] x 15. [15 bobbles]
Round 10: hdc x 60 around. [60]
Round 11: sc x 2, bobble, [sc x 3, bobble] x 14, sc. [15 bobbles]
Round 12: hdc x 60 around. [60]
Round 13: sc, bobble, [sc x 3, bobble] x 14, sc x 2. [15 bobbles]
Round 14: hdc x 60 around. [60]
Round 15: bobble, [sc x 3, bobble] x 14, sc x 3. [15 bobbles]
Round 16: hdc x 60 around. [60]
Round 17: [sc x 3, bobble] x 15. [15 bobbles]
Round 18: hdc x 60 around. [60] For toddler size, go to closing instructions.
CLOSING THE HAT
When you are ready to close your hat, ch 1. Fold the hat in half so that you are working from the right edge of the top of the hat. You will now single crochet through both the front and the back sides of the hat, in order to seam the two together.
Sc across x 30. When you reach the opposite side, tie off the yarn and weave in ends.

ADDING FLAIR:
To finish off your hat, add pom poms, tassels or fur poms to the upper corners of each side of your hat. For yarn poms, I used a Clover 3 3/8 inch pom pom maker for my hat and wound the yarn on each side tightly, four times. This makes a pretty thick pom pom! Shape your pom and tie on to your hat! Or choose fur poms to add to each side!
PLAY WITH COLOR:
Consider making your bobbles a different color than the rest of your toboggan! This is considered an advanced technique and you will need to be familiar with carrying yarn and making color switches. You want to be sure to switch to your bobble color before starting the bobble stitch and switch back to your main hat color when closing the bobble stitch.