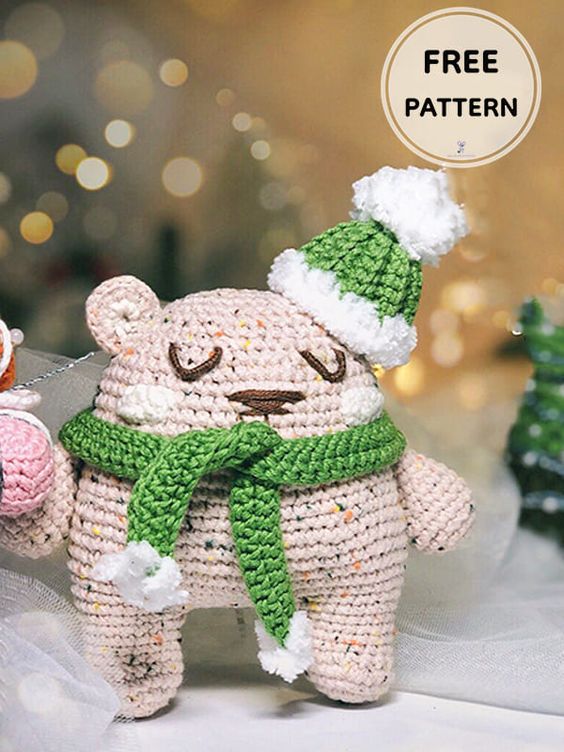
Crochet Winter Bear Amigurumi
Create your very own adorable winter bear amigurumi with crochet! This project is perfect for those cozy nights in, where you can let your creativity flow and bring this cute bear to life. Using different colored yarns, you can customize your bear to match your favorite winter theme, whether it's a classic white bear or a festive red and green one. The possibilities are endless when it comes to crochet, so have fun experimenting with different stitches and techniques to make your bear truly unique. This project is suitable for crocheters of all skill levels, from beginners looking to practice basic stitches to more experienced crafters wanting to challenge themselves with intricate details. With just a few simple materials and a bit of patience, you can create a one-of-a-kind winter bear that will bring joy and warmth to anyone who sees it. So grab your crochet hook and get started on this fun and rewarding project today!
Materials
• The main color
• A bit of extra color to ears and cheeks
• Embroidery thread for nose and eyes
• Red/ yellow/ green/ blue for scarf and hat
• Alize softy- white color
• Crochet hook, I’ve Clover size 1,75
• Sewing needle
• Scissors
• Polyester fiberfill
Abbreviation
MR– magic ring
Sc– single crochet
Inc– increase
Dec– Decrease
Slst– slip stitch
Ch– chain stitch
Hdc– half double crochet
Legs+ Body
Stuff as you go
Rnd 1. 6 sc in MR
Rnd 2. 6 inc (12)
Rnd 3. (sc, inc) x 6 (18)
Rnd 4. (2sc, inc) x 6 (24)
Rnd 5. 24sc
Rnd 6. 8sc, 4 dec, 8 sc (20)
Rnd 7-8. 20 sc (2 rnds)
Rnd 9. 16 sc, slst
Cut the thread. You have to crochet the second leg in the same way. But in the 9th round crochet only 10-11sc.
Plase, keep in mind that you can have different amount of sc. The legs must be strictly on the center or pigeontoed. Don’t cut thread on the second leg. next we will crochet the body. Make 12 ch and join to the first leg. Stuff as you go. Ensure that legs look in the same direction.
Rnd 10. 18sc along the first leg, dec, 12sc along the chain, dec, 18sc along the second leg, 12sc along the chain (62)
Keep in mind that decreases should be strictly on the sides.
Rnd 11. 8sc, (inc, sc) x 2, 25sc, (sc, inc) x 2, 21sc (66)
Rnd 12. 8sc, (inc, 2sc) x 2, 25sc, (2sc, inc) x 2, 21sc (70)
Rnd 13-18.70sc (6rnd)
Rnd 19. (5sc, dec) x 10 (60)
Rnd 20-29. 60 sc (10 rnd)
Rnd 30. (4sc, dec) x 10 (50)
Rnd 31. (4sc, dec) x 10 (40)
Rnd 32-35. 40sc (4rnd)
Rnd 36. (2sc, dec) x 10 (30)
Rnd 37. (sc, dec) x 10 (20)
Rnd 38. 10 dec
Stuff the top of the had very carefully. Tighten the hole. Cut the thread and fasten off.
Arms
Rnd 1. 6sc in MR
Rnd 2. 6 inc (12)
Rnd 3. (sc, inc) x 6 (18)
Rnd 4-6. 18sc (3rnd)
Rnd 7. 6sc, 3dec, 6sc (15)
Rnd 8. 15sc
Rnd 9. (3sc, dec) x 3 (12)
Rnd 10-12. 12sc (3rnd)
Stuff the lower part of legs only. Fold the edges together and crochet 6sc through both sides of the arm. Leave a long tail for the sewing. Crochet the second arm in the same way.
Ears
The first detail
Start crocheting with the extra color
Rnd 1. 8sc in MR
Tighten the hole and cut the thread
The second detail
Start crocheting with the main color.
Rnd 1. 8sc in MR, ch
Join together two details and crocheting through the both sides.
Rnd 2. 8 inc (16), ch
Rnd 3. 16 slst
Leave a long tail for sewing. Crochet the second ear in the same way.
Cheeks
Crochet in turning rows
Make a chain 6
Rnd 1. 5sc from the second loop from the hook
Rnd 2. ch, 5hdc, slst
Leave a long tail for sewing.
Crochet the second cheek in the same way.
Assembly
Sewing the arms between 24-25 rounds. Keep in mind that the arms should be strictly on the sides. Sew on the ears on 31-34 rounds on the sides of the head. Embroider the eyes with white/ pink/ beige or any other color you want to. There is 4sc from the one side of the eye to the other. I stepped back 4sc and fasten the thread at the center. Then just wind the thread to more expressive look. Embroider the nose with the same thread and at the level with eyes. Don’t forget about the mouth. Just look at the pics. Sew on the, cheeks on the same line with arms.
Congratulations, you have completed the amigurumi bear pattern!