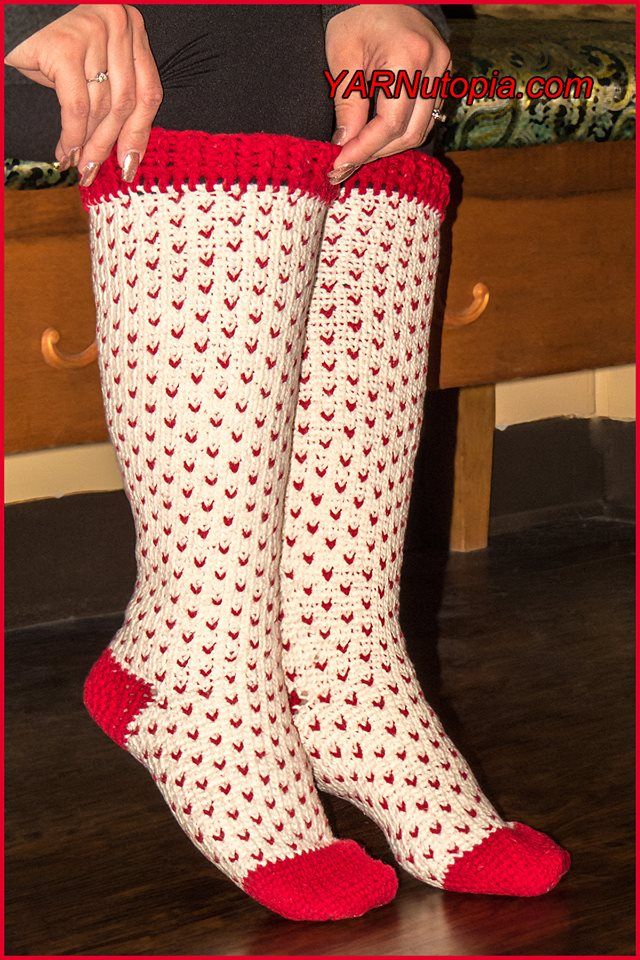
Crochet Fair Isle Knee High Socks
If you're looking to add a touch of cozy charm to your wardrobe, you'll love the Crochet Fair Isle Knee High Socks! These whimsical socks are not only stylish but also incredibly comfortable to wear. With their intricate Fair Isle design and knee-high length, they're perfect for keeping your legs warm and your outfit on point. Whether you're lounging at home or stepping out for a fun day, these socks are sure to be your new favorite accessory. So go ahead, slip into these delightful socks and let your style shine with every step you take!
Materials you will need:
–Red Heart Yarns Amore in Rooibos and Chamomile (2 balls of each color)
–Stitch Marker
–Size G6-4.25mm Crochet Hook
–Yarn Needle
–Scissors
NOTES:
-These socks are worked from the bottom up.
-These socks measure–Sole: 10 inches (24 cm), Length from Toe to Cuff: 21.5 inches (54 cm), Length of leg part only–cuff to heel: 13.5 inches (35 cm)
-These socks will fit a size 6-9 American Woman’s Shoe Size foot.
-To make these smaller or larger, just make sure your increases are all in a multiple of 4
-The CH 2 or CH 1 at the beginning of a round does NOT count as a stitch. Sl st to the beginning stitch of that round to go onto the next round.
-The majority of these socks are worked in continuous rounds. Mark your rounds with a stitch marker for each round so you do not lose your spot.
-Work over the top of your previous color strand when making the fair isle stitching
-Work INTO the stitch, and NOT at the top of the stitch
-SEW IN YOUR LOOSE ENDS AS YOU GO! YOU WILL THANK YOURSELF LATER.
Abbreviations :
- Ch: chain
- St(s): Stitch(es)
- Sl st: slip stitch
- SC: Single Crochet
- DC: Double Crochet
- FPDC: Front Post Double Crochet
- BPDC: Back Post Double Crochet
- SC2TOG: Single Crochet Decrease
Socks:
Right Sock instructions are written with the left sock pattern below.
Work in continuous rounds throughout this pattern.
Work over the top of your yarn strands when you change color.
Work INTO the stitch, NOT at the top of the stitch
Both Socks:
Starting with Red
Ch 11
Rnd 1: SC in 2nd ch from hook and across, put 3 SC in last Ch, continue working on opposite side of foundation chain, SC across, put 2 SC in last st. (21 sts)
Rnd 2: SC in 10 sts, 2 SC in next st, SC in 10 sts, 2 SC in last st. (23)
Place stitch markers on each side of the sock, this is where you will put increase stitches.
Rnd 3: SC in each stitch until you get to a marked stitch, put 2 SC in the marked St.
Rnds 4-11: Repeat Round 3 until you have 41 stitches (you will increase each round by 2 stitches)
After Round 11, if you have more or less than 41 stitches, just be sure you have a multiple of 4+1 (example: 40 is a multiple of 4, plus 1 = 41 sts)
If you end up having to do more rounds, it’s ok, just go onto the instructions for round 12 next.
Rnd 12: SC in each st around (change color after last stitch to go onto Round 13) (41 sts)
Rnd 13: Change color to Chamomile, SC in each st around. (41 sts)
From now on, I will refer to Rooibos as “Red” and Chamomile as “White” in this written pattern
Rnd 14: With White, SC2TOG, SC in next 2 sts, *Change color, SC with Red, Change color, SC in 3 sts with White, repeat from * around. (40 sts)
At this point, you should have a multiple of 4 stitches around (if you do not have 40 stitches, be sure to have a multiple of 4)
Rnd 15: With White, SC in each st around. (40 sts)
Rnd 16: With White, SC in 1 st, *change color to Red, SC in 1 st, Change color to White, SC in next 3 sts, repeat from * around ending with SC in last 2 sts with White.
Rnd 17: With White, SC in each st around. (40 sts)
Rnd 18: With White, SC in next 3 sts, *Change color to Red, SC in 1 st, Change color to white, SC in next 3 sts, repeat from * around ending with one st in Red on the last st.
Rnds 19-43: Repeat Rounds 15-18 as many times as you need to get the length of the top of the foot you need. END ON A REPEAT OF ROW 15 before moving onto the next section. If you do more or less rows, that is ok, FASTEN OFF when you are done with this part and jump to the instructions for the leg part next. You will create the heel hole after you have the length you need in this section.
Heel Hole and Leg part:
Mark 20 sts on the TOP side of the sock (see video tutorial to see where top side is)
These instructions start at 56 minutes and 40 seconds into the video tutorial.
Right Foot:
Heel Hole and Leg:
Rnd 1: Start in a stitch that is up 1 and over to the left 1 of a red stitch from the previous round (see video tutorial for specific location) In that stitch, attach your yarn and do the fair isle stitching (also known as: the established pattern) across 20 sts, end with a white stitch, Chain 18 loosely with White, skip 20 sts, continue to work in continuous rounds and go onto round 2 next.
Rnd 2: With White, SC in each st and each ch around. (38 sts)
Rnd 3: With White, SC in next 3 sts, *Change color to Red, SC in 1 st, Change color to white, SC in next 3 sts, repeat from * around ending with one st in Red on the last st. (if this does not line up with your fair isle stitches, just do the fair isle design as established, just keep note of what you started this round with and ended with because you will be repeating this round in the future)
Rnd 4: With White, SC in each st around.
Rnd 5: Fair Isle Stitches: With White, SC in 1 st, *change color to Red, SC in 1 st, Change color to White, SC in next 3 sts, repeat from * around ending with SC in last 2 sts with White.
Rnd 6: With White, SC in each st around AND put an EXTRA stitch in the last st. (increase made) (39 sts)
Rnds 7-10: repeat Rounds 3-6 one time.
Rnd 11: With White, SC in next 3 sts, *Change color to Red, SC in 1 st, Change color to white, SC in next 3 sts, repeat from * around.
Rnd 12: With White, SC in each st around AND put an EXTRA stitch in the last st. (increase made) (39 sts)
Rnd 13: With White, SC in 1 st, *change color to Red, SC in 1 st, Change color to White, SC in next 3 sts, repeat from * around.
Rnd 14: With White, SC in each st around AND put an EXTRA stitch in the last st. (increase made) (39 sts)
Since the increase is made, the ends of your rounds will turn out differently each time. Start your rounds EXACTLY THE SAME as instructed. See video tutorial for explanation.
Rnds 15-35: Repeat Rounds 11-14 for however long you need to so this part fits around your calf of your leg. I had 52 sts at the end of Round 35. You will need to end on a repeat of Round 11 before going onto the next round.
If you need to repeat this part more or less, just be sure your stitch count is a multiple of 4.
Rnd 36: With White, SC in each st and each ch around. (do not increase any more)
Rnd 37: Repeat Round 11
Rnd 38: With White, SC in each st and each ch around.
Rnd 39: Repeat Round 13
Left Foot
Heel Hole and Leg:
Rnd 1: Start in a stitch that is up 1 and over to the left 1 of a red stitch from the previous round. In that stitch, attach your yarn and SC in that stitch, Chain 18 loosely, Sk 20 sts, SC in NEXT st working the fair isle stitches on the rest of the sts on this round.
Rnd 2: With White, SC in each st and each ch around. (38 sts)
Rnd 3: With White, SC in first 2 sts, *Change color to Red, SC in next st, Change color to White, SC in next 3 sts, repeat from * around.
(When doing Round 3, you MAY have to add another stitch in somewhere to make the fair isle stitches line up correctly, if you do not, that’s ok, but if you do, that is also ok–nobody will notice, just use your judgement on if your fair isle stitches are lining up)
Rnd 4: With White, SC in each st and each ch around.
Rnd 5: With White, SC in first 4 sts, *Change color to Red, SC in next st, Change color to White, SC in next 3 sts, repeat from * around. (38 sts)
Rnd 6: With White, SC in each st around AND put an EXTRA stitch in the last st. (increase made) (39 sts)
Rnds 7-10: repeat Rounds 3-6 one time.
Rnd 11: With White, SC in first 2 sts, *Change color to Red, SC in next st, Change color to White, SC in next 3 sts, repeat from * around.
Rnd 12: With White, SC in each st around AND put an EXTRA stitch in the last st. (increase made) (40 sts)
Rnd 13: With White, SC in first 4 sts, *Change color to Red, SC in next st, Change color to White, SC in next 3 sts, repeat from * around.
Rnd 14: With White, SC in each st around AND put an EXTRA stitch in the last st. (increase made) (41 sts)
Rnds 15-35: Repeat Rounds 11-14 for however long you need to so this part fits around your calf of your leg. I had 52 sts at the end of Round 35. You will need to end on a repeat of Round 11 before going onto the next round.
If you need to repeat this part more or less, just be sure your stitch count is a multiple of 4.
Rnd 36: With White, SC in each st and each ch around. (do not increase any more)
Rnd 37: Repeat Round 11
Rnd 38: With White, SC in each st and each ch around.
Rnd 39: Repeat Round 13
BOTH SOCKS:
Rounds 40-86: Repeat Rounds 36-39 on the sock you are working on. End on a repeat of round 36 or 38 (plain SC with White Row)
You can continue this repeat until you want to make the cuff–For shorter legs, end earlier, for longer legs, continue the repeat.
Fasten off after you are done with the length and ready to make the cuff.
Next, go onto making the cuff.
Cuff:
Both Socks:
Attach Red to any stitch on back of sock.
Work in the top of the stitches on this part, not IN the stitch like you were for the fair isle design.
Rnd 1: Ch 2 (does not count as anything), DC in same st and each st around, sl st to first DC.
Rnd 2: Ch 2, FPDC on first St, *BPDC on next st, FPDC on next st, repeat from * around, sl st to first FPDC.
Rnds 3-4: Repeat Round 2
Fasten off. Weave in ends.
Heel:
Both Socks
With Red
Attach yarn on bottom sole side in center
Rnd 1: Ch 1, SC 38 sts evenly around the Heel Hole, sl st to first SC.
Rnd 2: Ch 1, SC in first 7 sts, SC2TOG, SC in next st, SC2TOG, SC in 14 sts, SC2TOG, SC in next st, SC2TOG, SC in last 7 sts, sl st to first st. (34 sts)
Rnd 3: Ch 1, SC in each st around, sl st to first st. (34)
Rnd 4: Ch 1, SC in first 6 sts, SC2TOG, SC in next st, SC2TOG, SC in 12 sts, SC2TOG, SC in next st, SC2TOG, SC in last 6 sts, sl st to first st. (30 sts)
Rnd 5: Ch 1, SC in first 5 sts, SC2TOG, SC in next st, SC2TOG, SC in 10 sts, SC2TOG, SC in next st, SC2TOG, SC in last 5 sts, sl st to first st. (26 sts)
Rnd 6: Ch 1, SC in first 4 sts, SC2TOG, SC in next st, SC2TOG, SC in 8 sts, SC2TOG, SC in next st, SC2TOG, SC in last 4 sts, sl st to first st. (22 sts)
Rnd 7: Ch 1, SC in first 3 sts, SC2TOG, SC in next st, SC2TOG, SC in 6 sts, SC2TOG, SC in next st, SC2TOG, SC in last 3 sts, sl st to first st. (18 sts)
Rnd 8: Ch 1, SC in first 2 sts, SC2TOG, SC in next st, SC2TOG, SC in 4 sts, SC2TOG, SC in next st, SC2TOG, SC in last 2 sts, sl st to first st. (14 sts)
Fasten off with long tail for sewing
Assembly Step:
Turn sock inside out, Sew heel hole closed. Fasten off, weave in all ends.
Enjoy!