Crochet a Flat Pumpkin Face
Crocheting a flat pumpkin face can be a fun and creative project to get you into the Halloween spirit! To start, gather your orange yarn, crochet hook, and black yarn for the facial features. Begin by crocheting a flat circle in the desired size for your pumpkin face. Once you have your base, you can then add details like eyes, a nose, and a mouth using the black yarn to bring your pumpkin to life. Feel free to get creative with different facial expressions or even add some green leaves on top to complete the look. Crocheting is a relaxing and enjoyable craft, and creating a cute pumpkin face is a perfect way to spread some seasonal cheer!
Materials & Notes
- Orange DK yarn. I used King Cole Dollymix DK acrylic in orange (shade 144)
- Green DK yarn – small scrap for stalk
- Black yarn or embroidery floss for eyes & mouth
- 3.5mm crochet hook – I use Addi swing hooks
- Embroidery needle
- Optional: fabric stiffener. I used Dylon spray starch.
Finished size: 10-11cm wide by 8-9 cm tall approx (excluding stalk) using DK yarn.
Gauge is not important here so you can use any weight yarn. Your pumpkin will just be a bit bigger or smaller. Make sure you change the hook size too. I suggest using a hook a bit smaller than standard here e.g. you could try 4.5mm with aran or worsted yarn instead of 5mm.
Acrylic yarn works well for decorations as it is fairly sturdy & very affordable. Cotton should also work nicely for a premium look.
Abbreviations
NB this pattern uses US crochet terms. The equivalent UK crochet stitches are listed after each term.
- R – row
- st – stitch(es)
- ch – chain
- sl st – slip stitch
- sc – single crochet stitch (UK: double crochet)
- sc2tog – single crochet 2 stitches together to reduce to 1 stitch (UK: double crochet 2 together)
- hdc – half double crochet stitch (UK: half treble crochet)
- dc – double crochet stitch (UK: treble crochet)
How to crochet a flat pumpkin face
Crochet main pumpkin shape
Note: turn and ch 1 after each row unless stated otherwise
R1: with orange yarn ch 13, skip 1st ch, sc in 12 ch [12 st]
R2: (sc, 2 sc in next st, sc in next) x 4 times [16 st]
R3-4: sc in each st [16 st]
R5: (sc in 2 st, 2 sc in next st, sc in next) x 5 times [20 st]
R6-7: sc in each st [20 st]
R8: (sc in 2 st, sc2tog, sc in next) x 4 times [16 st]
R9-10: sc in each st [16 st]
R11: (sc in 1st, sc2tog, sc in next) x 4 times [12 st]
R12: sc in each st [12 st]. NB no turning chain at end.
R13: (sl st in 1st st, hdc in 2nd st, dc in next 2 st, hdc in 5th st, sl st in 6th) x 2 times.
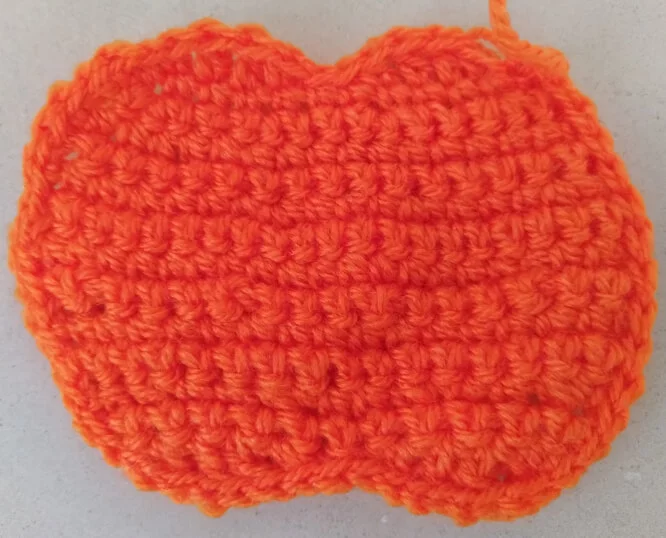
Row 13 forms the bottom of your pumpkin. Bind off.
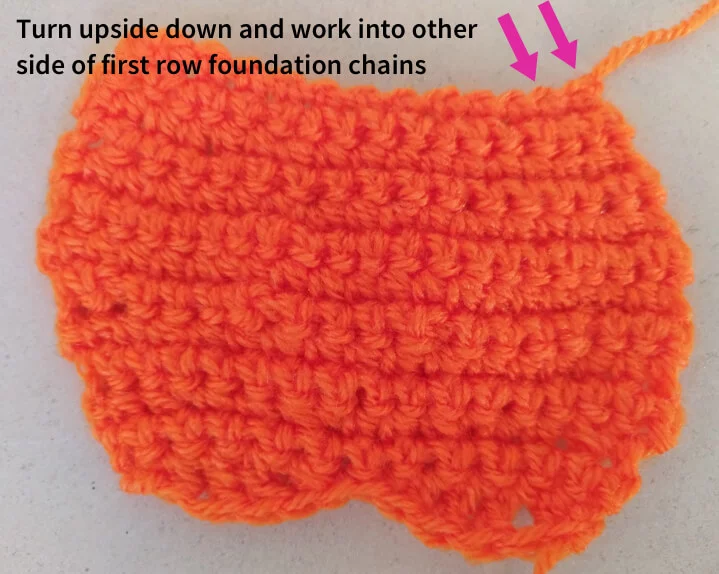
Shape top of pumpkin
Turn your shape upside down. Now work into the 12 loops along the top edge left from your first (foundation) row of single crochet.
Put your hook through the 1st loop & pull a yarn loop through. This acts as a slip stitch & now repeat row 13 above, starting with the hdc in the 2nd loop, to form the top curves of the pumpkin.
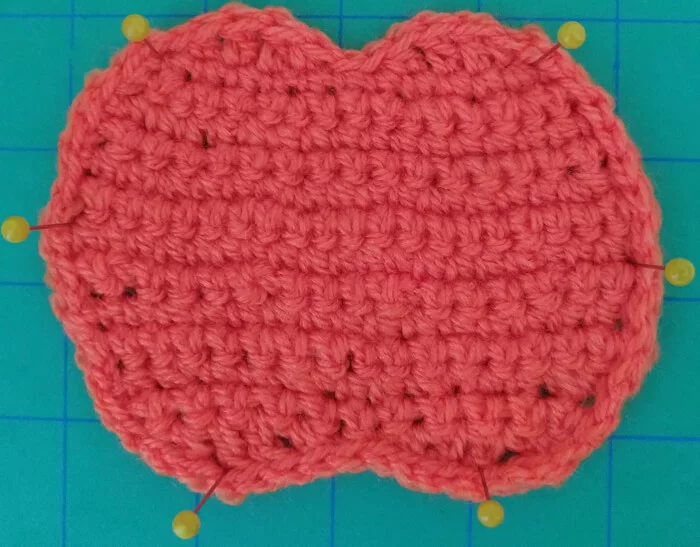
Outline pumpkin (optional)
To neaten the pumpkin edges, instead of binding off, ss down the left side, across the bottom curves & up the right side. Bind off at the top right corner.
Be sure to add enough slip stitches so your shape will flatten once blocked. If in doubt, add a few. I made 14-16 sl st on each side. Along the bottom I did 2 sl st in each hdc & dc.
Bind off & weave in all ends.
Block your pumpkin (optional)
If your pumpkin does not lie flat, soak it in water for 15 mins approx, squeeze excess water out with a towel & leave to dry. You can use a few pins to secure the shape if you like. Acrylic dries quite quickly.
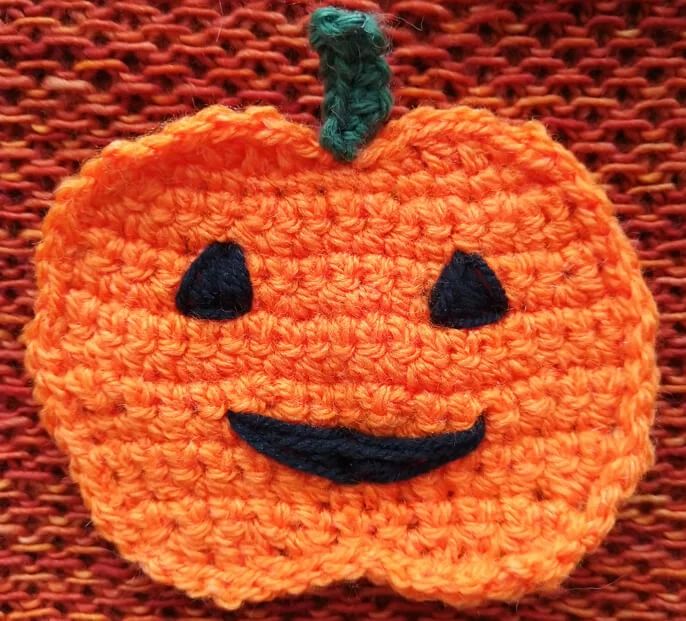
Add pumpkin stalk
Using green yarn, put hook through a central slip stitch in the top row. Pull through a loop of yarn and ch 7.
Skip 2 ch, hdc in 5 ch, sl st into a central slip stitch on the top of the pumpkin to complete the stalk. Bind off & weave in ends.
Embroider eyes
Your pumpkin is broken up into 7 horizontal bands (top & bottom curves with 5 straight bands in between).
Using an embroidery needle with black yarn or floss, come up about 4 stitches in from left side at the bottom of band 3. Then make a right diagonal stitch putting your needle down at the top of band 3. Now bring your needle back up at the bottom of band 3 about 5 stitches in from the left. These 3 points form the left eye triangle. Fill in the triangle with vertical or diagonal stitches.
Repeat for the right eye, starting 4 stitches in from the right. This leaves 4-5 stitches between the eyes.
Embroider mouth
Starting 4.5 bands down from the top, approx in line with the mid point of the left eye, bring your needle up and then down about 4 stitches to the right and half a band down (5 bands down from the top). Next bring your needle up another 4 stitches right, in line with the centre of the right eye and the left corner of the mouth. Bring your needle back down at the centre to complete the top mouth line.
Bring your needle up 2 rows of single crochet downwards (mid band 6). Then put your needle down at the top left mouth corner, back up at the bottom centre and down at the top right corner to complete the mouth outline.
Fill this roughly with short vertical stitches, which you could leave as is for a jagged smile. Otherwise, make a couple of long horizontal stitches across the mouth on top of these to fill it fully for a solid black smile.

Finishing (optional)
You can make your pumpkin a bit more robust for hanging etc by spraying it with stiffening spray & leaving it to dry. I used Dylon spray starch.