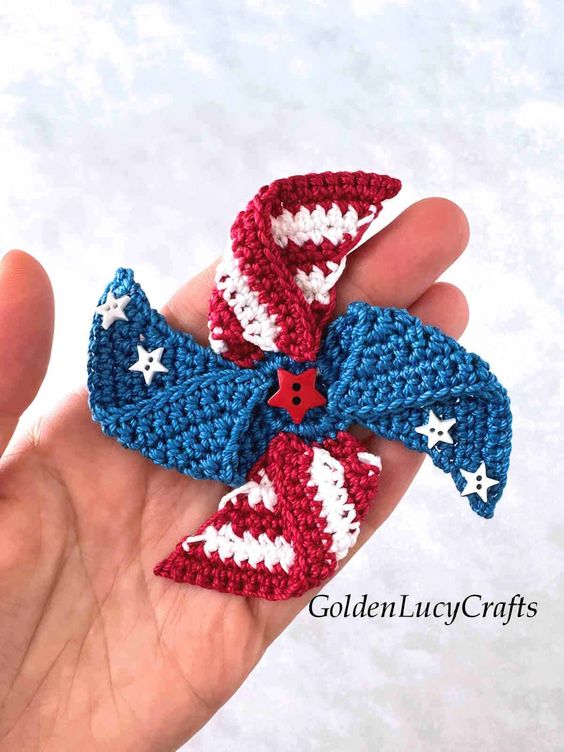
Crochet Pinwheel Decoration
Celebrate Independence Day in style with a handmade crochet pinwheel decoration! This festive piece will add a touch of charm to your 4th of July celebrations, whether you hang it on your front door, use it as a centerpiece on your dining table, or display it in your backyard for a patriotic touch. The intricate design of the pinwheel, created with colorful yarn and a crochet hook, will surely catch the eye of your guests and set the perfect mood for the holiday. Whether you are hosting a backyard barbecue, a picnic in the park, or a festive gathering with friends and family, this 4th of July decoration will be a standout piece that adds a personal touch to your decor. So why settle for store-bought decorations when you can create something special with your own hands? Let your creativity shine this Independence Day with a beautiful crochet pinwheel decoration that will be the talk of the party!
Abbreviations:
Ch – chain
Rnd – round
RS – right side
SC – single crochet
Sl St – slip stitch
St (Sts) – stitch (stitches)
Skill Level:
Easy.
Finished Size:
As an example, I have made my crochet patriotic pinwheel in two sizes using different yarn weights.
The large pinwheel is about 7” in diameter.
The small pinwheel is about 4” in diameter.
Yarn and hooks:
Large pinwheel
- Medium weight #4 cotton yarn. Colors – red, white, and blue. I used Red Heart Super Saver yarn.
- Crochet hook H/8 – 5 mm
Small pinwheel
- Crochet cotton thread size #3. Colors – red, white, and blue. I used Aunt Lydia’s cotton thread #3.
- Crochet hook 1/2.75 mm
Other materials:
- Tapestry needle
- Sewing needle
- Matching sewing thread
- Hot glue gun
- Craft buttons – large red star button and small white stars.
Notes:
- How to change to a new color – work the final Stitch with the first color, but do not complete the Stitch. You will have 2 loops remain on the hook. Drop first color and draw through the loops on the hook new color and complete the Stitch.
- Ch 1 at the beginning of the rounds doesn’t count as a stitch.
Instructions:
Copyright: This pattern is an original design by GoldenLucyCrafts. You may not copy, rewrite, redistribute or resell this pattern in any form, this includes making video tutorials. You may not translate this pattern to another language and publish the pattern or any parts of it.
With blue color, Ch 5, join with Sl St to form a ring;
Rnd 1. (RS). Ch 1, 12 SC in ring, Sl St to first SC to join. Total – 12 SC.
Rnd 2. Ch 1, 2 SC in each St of previous round. Total – 24 SC.
Do not cut off, continue working on pinwheel blade. Now we will be working in rows.
First blade
Row 1. Ch 1, SC in same St and in each of next 5. Total – 6 SC. Turn.
Row 2. Ch 1, 2 SC in first St, SC in each of next 4, 2 SC in last St. Total – 8 SC. Turn.
Row 3. Ch 1, SC in each St across. Total – 8 SC. Turn.
Row 4. Ch 1, 2 SC in first St, SC in each of next 6, 2 SC in last St. Total – 10 SC. Turn.
Row 5. Ch 1, SC in each St across. Total – 10 SC. Turn.
Row 6. Ch 1, 2 SC in first St, SC in each of next 8, 2 SC in last St. Total – 12 SC. Turn.
Row 7. Ch 1, 2 SC in first St, SC in each of next 10, 2 SC in last St. Total – 14 SC. Turn.
Row 8. Ch 1, 2 SC in first St, SC in each of next 12, 2 SC in last St. Total – 16 SC. Turn.
Row 9. Ch 1, 2 SC in first St, SC in each of next 14, 2 SC in last St. Total – 18 SC. Turn.
Row 10. Ch 1, 2 SC in first St, SC in each of next 16 2 SC in last St. Total – 20 SC. Fasten off.
Second blade
With RS facing you and first blade pointed up, join red color to the next St of Rnd 2 on the left side of the blade.
Row 1. Ch 1, SC in same St and in each of next 5. Total – 6 SC. Turn.
Row 2. Ch 1, 2 SC in first St, SC in each of next 4, 2 SC in last St. Change color to white.Total – 8 SC. Turn.
Row 3. Ch 1, SC in each St across. Total – 8 SC. Turn.
Row 4. Ch 1, 2 SC in first St, SC in each of next 6, 2 SC in last St. Change color to red. Total – 10 SC. Turn.
Row 5. Ch 1, SC in each St across. Total – 10 SC. Turn.
Row 6. Ch 1, 2 SC in first St, SC in each of next 8, 2 SC in last St. Change color to white. Total – 12 SC. Turn.
Row 7. Ch 1, 2 SC in first St, SC in each of next 10, 2 SC in last St. Total – 14 SC. Turn.
Row 8. Ch 1, 2 SC in first St, SC in each of next 12, 2 SC in last St. hange color to red. Total – 16 SC. Turn.
Row 9. Ch 1, 2 SC in first St, SC in each of next 14, 2 SC in last St. Total – 18 SC. Turn.
Row 10. Ch 1, 2 SC in first St, SC in each of next 16 2 SC in last St. Total – 20 SC. Fasten off.
Third blade
With RS facing you, join blue color to the next St of Rnd 2 on the left side of blade #2.
Follow the instructions for blade #1.
Fourth blade
With RS facing you, join red color to the next St of Rnd 2 on the left side of blade #3.
Follow the instructions for blade #2.
Weave in all the ends.
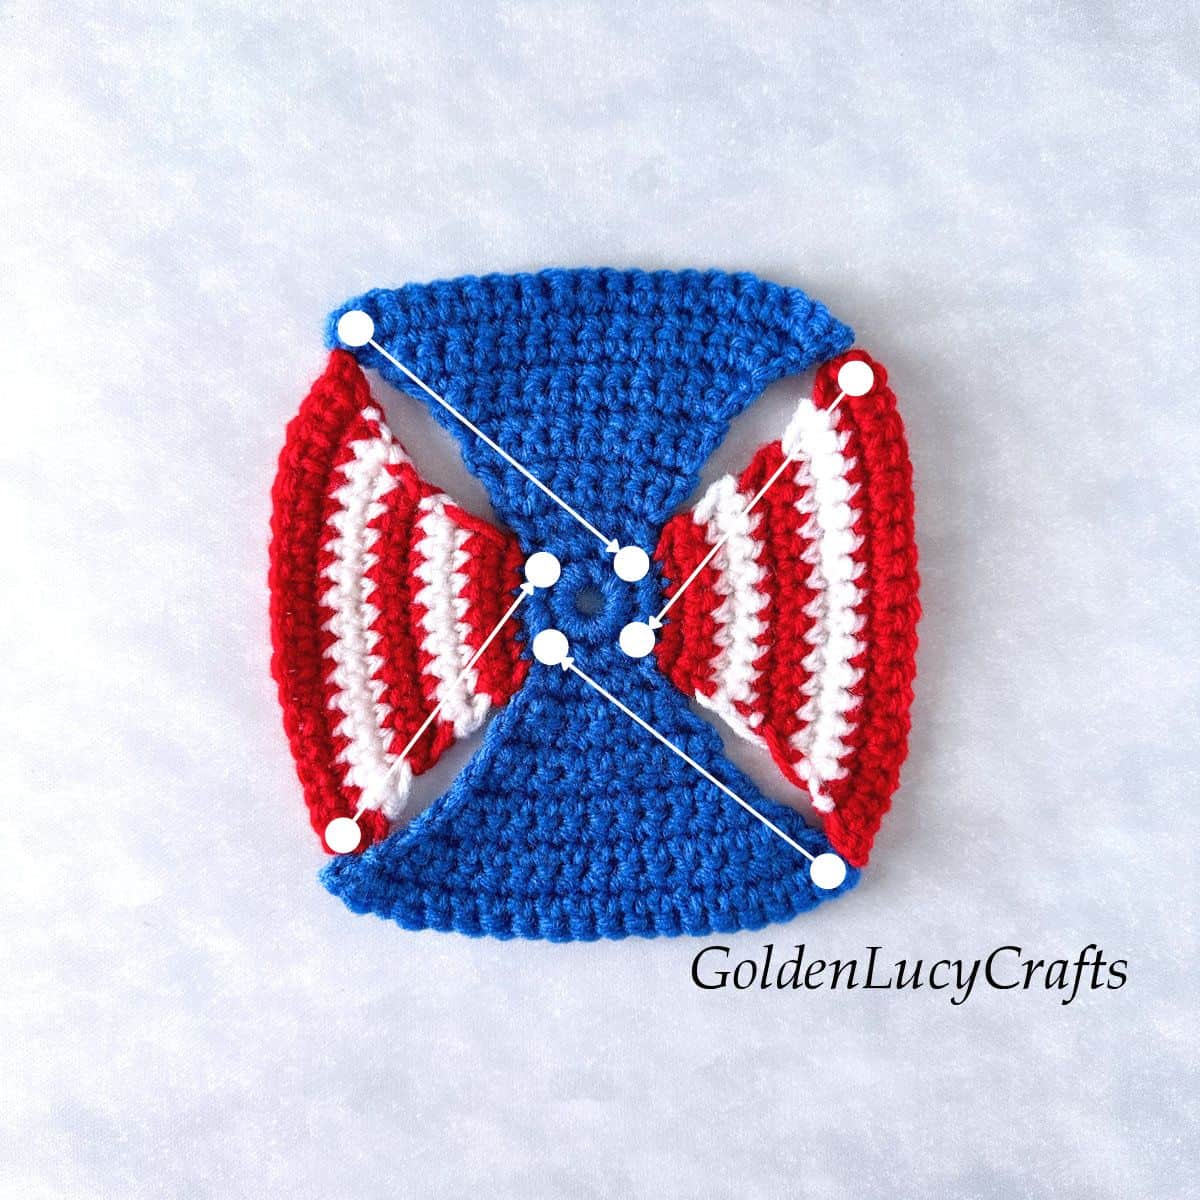
Assembly
With RS facing you, fold the left corner of the first blade over to the first round. (If you prefer, you can fold the corner to the center). Using a sewing needle and matching thread, sew the corner in place.
Repeat the steps above with the remaining three blades.
Finishing
Attach a large star in the center and small white stars onto the blue blades. You can sew the stars on or you can glue them on using a hot glue gun.