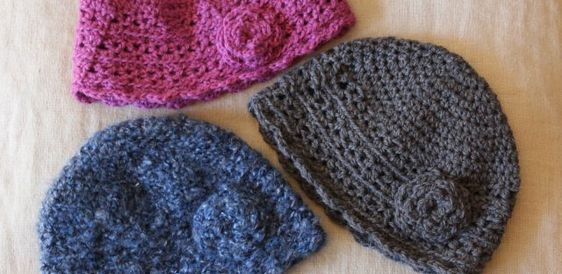
Crochet The Lace Hat
Crocheting the lace hat is such a fun and creative project to dive into! There's something truly satisfying about watching the delicate lace pattern come together with each stitch. Not only is it a great way to showcase your crochet skills, but the end result is a gorgeous accessory that can add a touch of elegance to any outfit. Whether you're a seasoned crocheter or just starting out, this project offers a perfect blend of challenge and relaxation. So grab your yarn and hook, and let's craft a beautiful lace hat that you'll be proud to show off!

Various worsted weight yarns
H hook (hat) and G hook (flower)
I included instructions for more rows than you should need for the crown of the hat. This way the hat is very flexible size-wise. You need not worry about gauge and just use an appropriate size crochet hook for whatever yarn you have. When you are working the rows and you get to a circumference that is a bit less (maybe an inch or so less) than your desired circumference for fit, just move on to working the side-band rows. Measure the circumference again after a couple of those rows to double check it. This hat should work well for baby to extra large size. My adult/older child size hats had 10-11 rows of increase (crown) and 3-4 sets of side-band rows. In other words, you probably won’t need to work all 13 rows of the “crown of the hat” section below before you go on to the side-band section. I hope that makes sense.
Crown of the hat
Row 1: 9 hdc in a loop, tighten loop
Row 2: 2hdc in each around (18 total)
Row 3: *hdc, 2hdc* repeat around (27 total)
Row 4: hdc even around
Row 5: *hdc, hdc, 2hdc* repeat around (36 total)
Row 6: *hdc, hdc, hdc, 2hdc* repeat around (45 total)
Row 7: *hdc, hdc, hdc, hdc, 2hdc* repeat around (54 total)
Row 8: hdc even around
Row 9: *hdc, hdc, hdc, hdc, hdc, 2hdc* repeat around (63 total)
Row 10: *hdc, hdc, hdc, hdc, hdc, hdc, 2hdc* repeat around (72 total)
Row 11: *hdc, hdc, hdc, hdc, hdc, hdc, hdc, 2hdc* repeat around (81 total)
Row 12: hdc even around
Row 13: *hdc, hdc, hdc, hdc, hdc, hdc, hdc, hdc, 2hdc* repeat around (90 total)
When you get to a bit less than your goal width for the hat (circumference) proceed to the next 3 rows for the side-band. For those, your stitch count will remain constant. So if you stopped at row 7 with a stitch count of 54, for the side-band, the stitch count will stay 54 for each row.
Side-band
sc in next, sl st in next to round off (This will off-set your rows. Just roll with it. It’s fine.)
Row 1: ch 3, hdc in same st, sk 2, *hdc, ch 1, and hdc in next, sk 2* repeat around, end with a sl st into the ch 3 space
Row 2: ch 2, 2dc in same space, 3dc into each ch 1 space around, sl st to second ch
Row 3: sc blo even around, sl st to first stitch
Row 4: sl st in next, ch 3, hdc in same st, sk 2, *hdc, ch 1, and hdc in next, sk 2* repeat around, end with a sl st into the ch 3 space
Row 5: ch 2, 2dc in same space, 3dc into each ch 1 space around, sl st to second ch
Row 6: sc blo even around, sl st to first stitch
Repeat Rows 4-6 until the hat is as long as you want it to be.
Trim (optional)
*sk 1, 4hdc in next, sk 1, sl st* repeat around
Flower
Row 1: In a loop *ch1, 3hdc, ch 1, sl st* repeat 3 more times, tighten loop
Row 2: For the foundation of the next row: ch 1, sl st to the back of the first petal *ch 1, sl st to the back of the next petal* repeat around
Row 3: In the spaces left by the chains in the previous row work: *hdc, dc, hdc, sl st* x 5
Row 4: For the foundation of the next row: ch 1, sl st to the back of the first petal *ch 2, sl st to the back of the next petal* repeat around
Row 5: In the spaces left by the chains work: *hdc, dc, dc, hdc, sl st* x 6
finish off and sew to hat