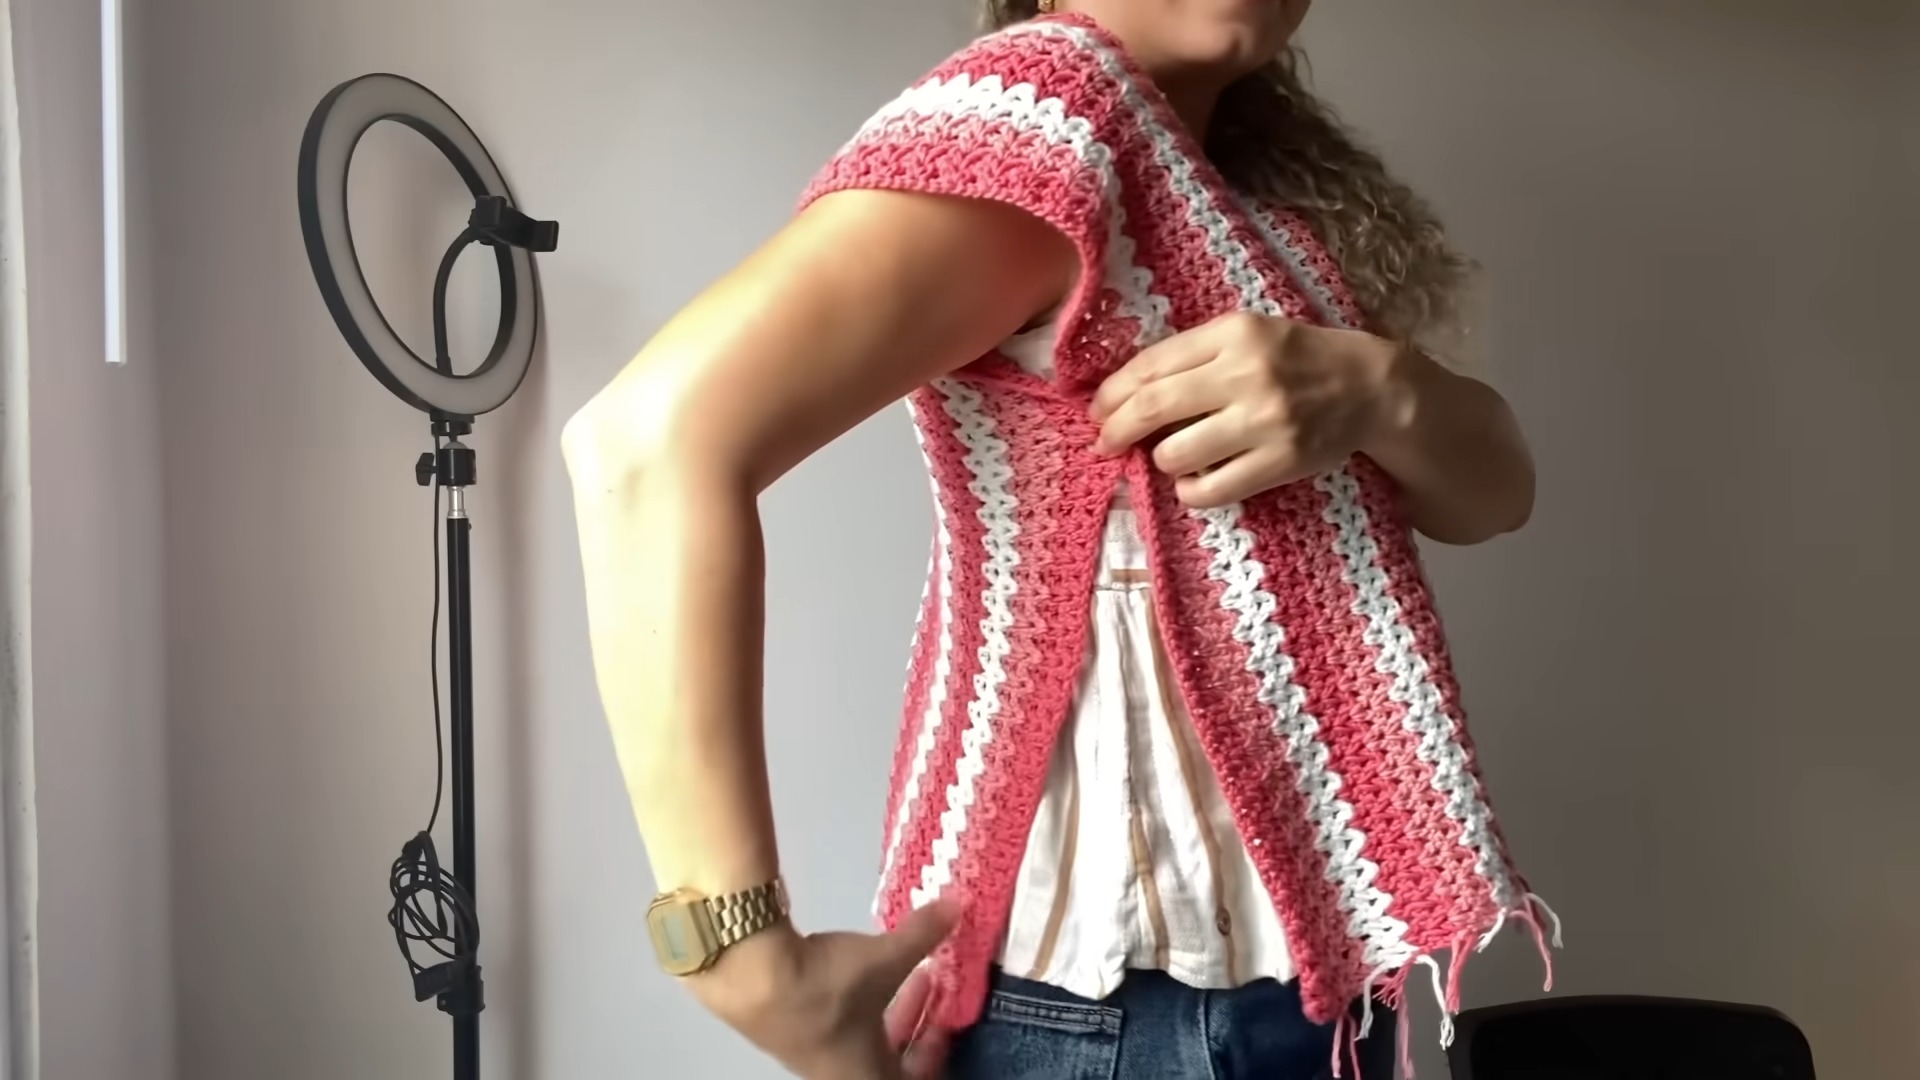
Crochet Blouse for Summer Wear
Imagine strolling along the beach in a breezy crochet blouse, feeling effortlessly chic and cool in the summer heat! Crochet blouses are a perfect choice for warmer days, with their delicate details and airy design. They add a touch of bohemian flair to any outfit, whether you pair them with denim shorts or a flowy skirt. The versatility of crochet blouses makes them a must-have in any summer wardrobe, providing a stylish option for both casual outings and more dressed-up occasions. So, embrace the laid-back vibes of summer with a crochet blouse — you'll feel comfortable, trendy, and ready to soak up the sun!

Materials and Preparation
To make this easy blouse, you’ll need:
- Yarn: Copito yarn in three colors (e.g., white, off-white, and one additional color) or similar yarn.
- Yarn Weight: Light or medium (check gauge for compatibility).
- Crochet Hook: 4 mm crochet hook.
- Tools: Wool needle (with a wide head) for sewing, scissors.
- Calculator (to adjust starting chain for size, if needed).
Abbreviations and Notes
Abbreviations:
- CH: Chain
- DC: Double Crochet
- SC: Single Crochet
- V-stitch: (DC, CH, DC) worked into the same stitch
- SL ST: Slip Stitch
Notes:
- The blouse is composed of two rectangles joined together.
- Use V-stitch throughout the blouse with color changes as desired.
- This pattern is adjustable for different sizes—just modify the width and length of each rectangle based on your measurements.
- Be mindful of even stitches while sewing to ensure symmetry.
Gauge, Approximate Size, and Pattern Notes
Gauge:
12 V-stitches and 10 rows = 10 cm x 10 cm using 4 mm hook and Copito yarn.
Approximate Size:
- Designed for sizes M-L with initial starting chains of 200 and rectangle dimensions of 106 cm width x 24 cm height.
- Adjust dimensions for smaller or larger sizes by increasing/decreasing starting chains.
Pattern Notes:
- The neck opening, sleeves, and blouse length are all customizable.
- The edge finishing uses Crab Stitch (reverse single crochet stitch). Optional adjustments can be made for decoration on edges.
Step-by-Step Pattern
Step 1: Foundation Chain
Begin with your first color of yarn.
Make a slip knot and CH 200 for sizes M-L (or adjust depending on your size).
Add 2 extra chains for turning.
Step 2: Row 1 – Establish V-Stitch Pattern
Skip the first 3 CH (counts as DC) and work 1 DC, CH 1, 1 DC into the 3rd CH.
Skip 2 CH, work a V-stitch in the next CH (DC, CH 1, DC).
Repeat this pattern across the row until only 2 CH remain.
Work 1 DC into the final CH.
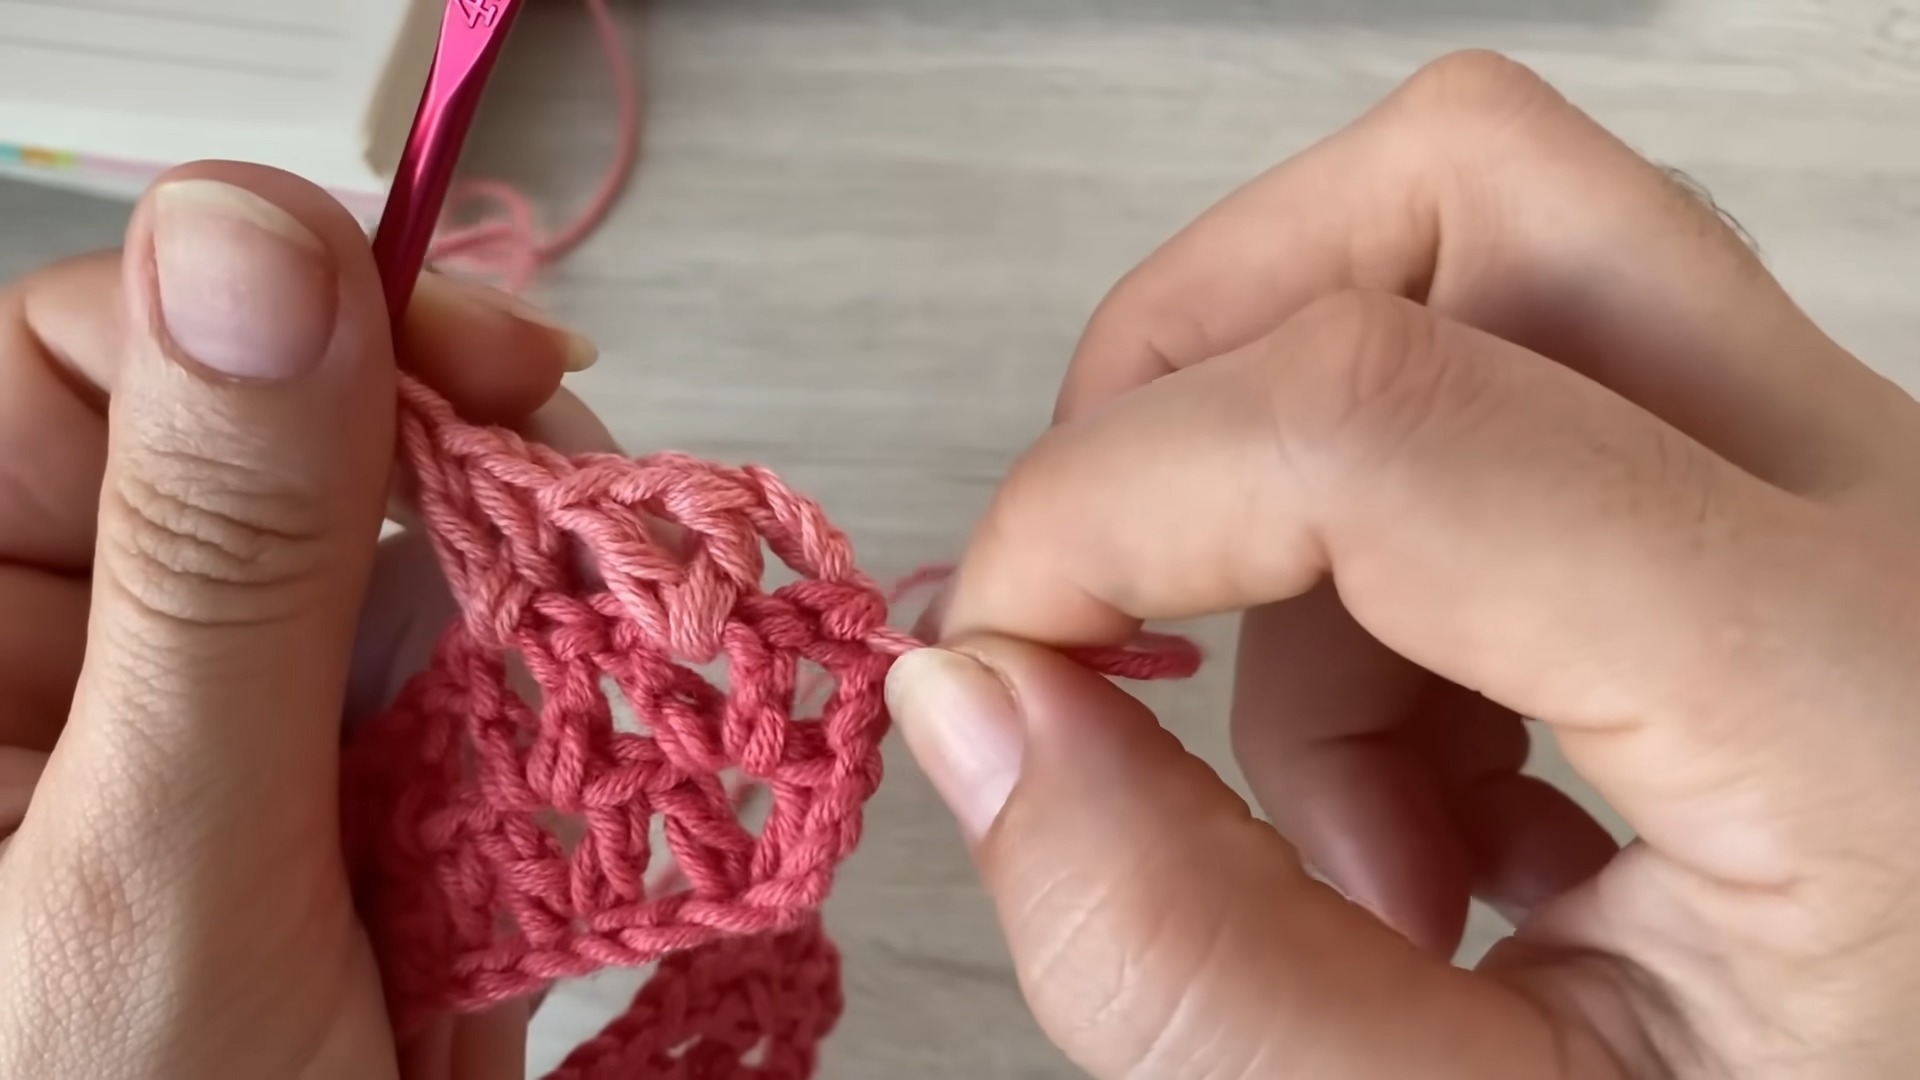
Step 3: Row 2 – V-Stitch on V-Stitch
CH 3, turn your work.
Work 1 DC, CH 1, 1 DC into the V-space created from Row 1.
Continue working V-stitches into each V-space from the previous row.
At the end, work 1 DC into the top of the initial CH 3 from Row 1.
Step 4: Continue Pattern & Color Changes
Repeat the instructions for Row 2 until desired rectangle height (24 cm).
Switch colors as desired by finishing the last DC of the row with the new color. Tie off loose ends securely and hide them.
Step 5: Create the Second Rectangle
Repeat Steps 1–4 to create a second identical rectangle.
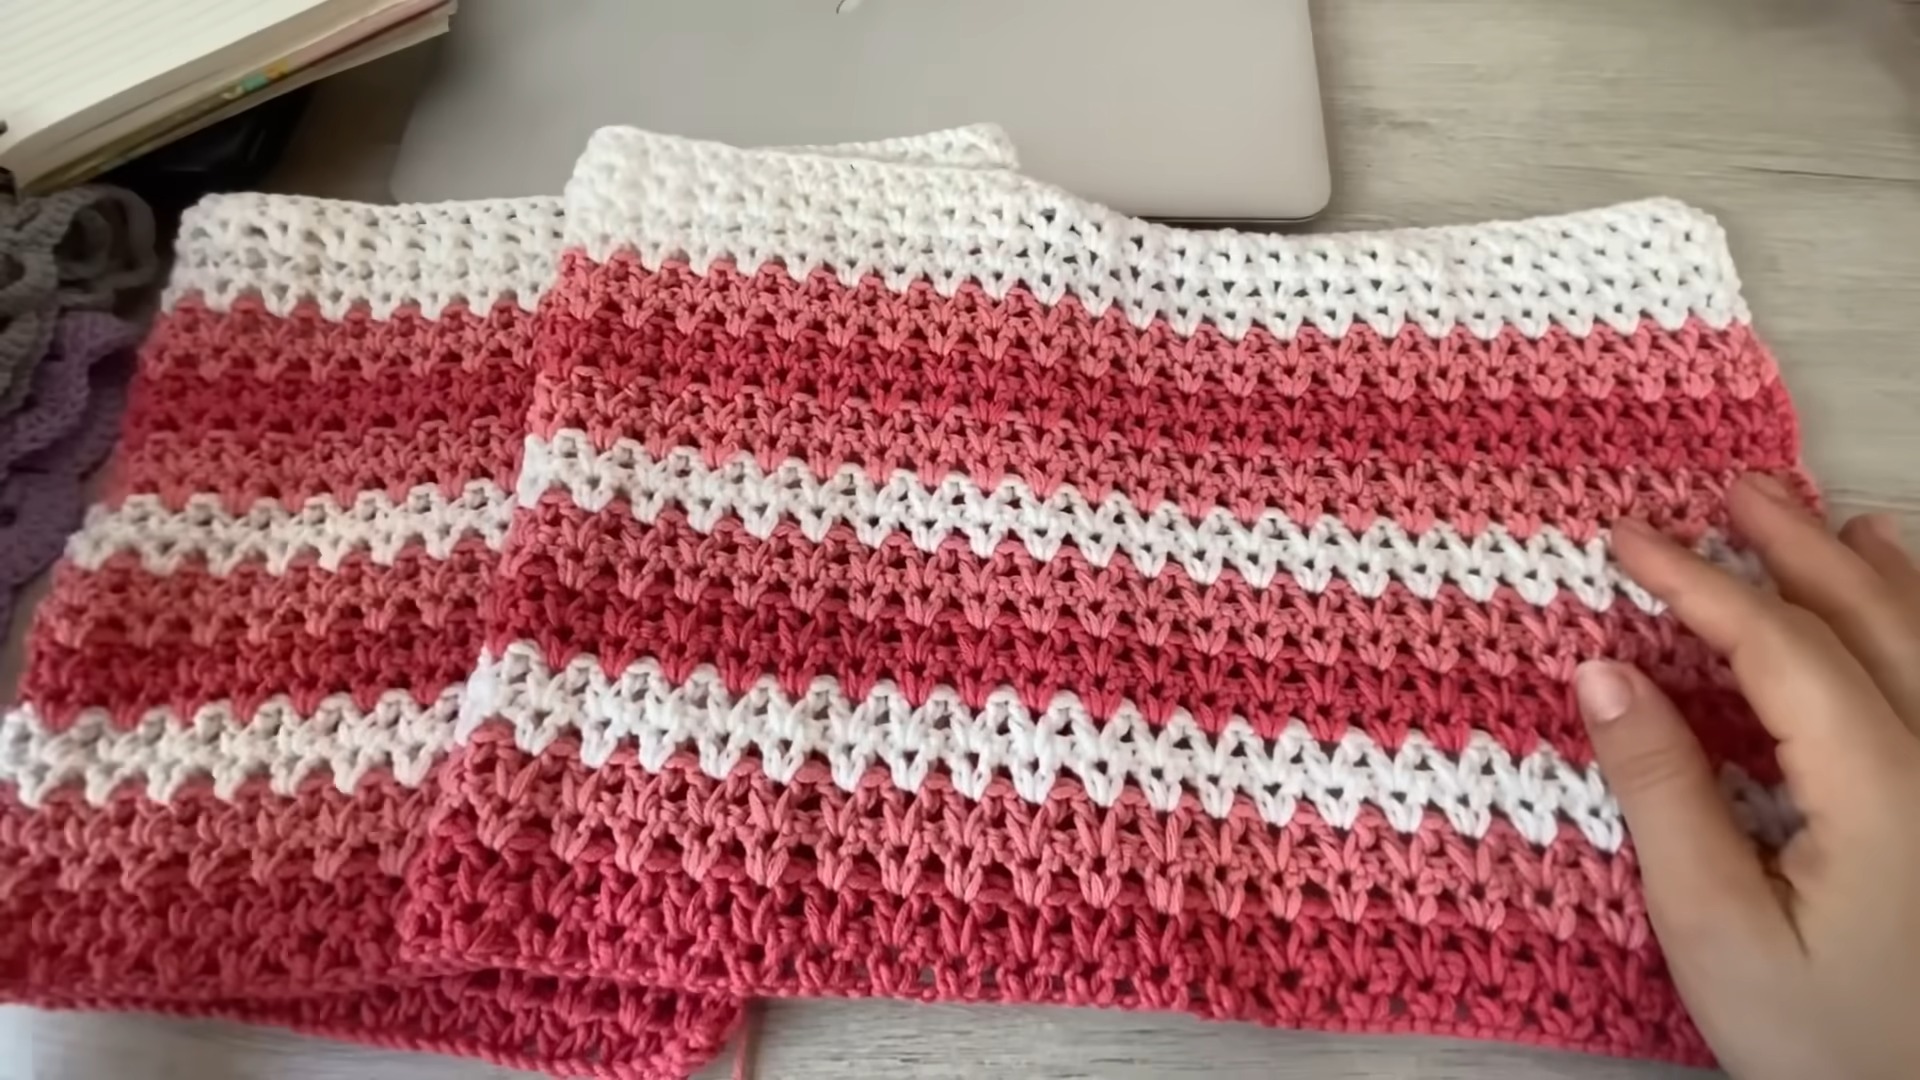
Step 6: Joining Rectangles
Align the two rectangles, keeping the white edge as the center.
Use a wool needle and yarn to sew 32 cm for the front neckline and 32 cm for the back neckline. Leave the remaining section open for the neck.
Step 7: Sewing the Sides
Leave space for sleeves by sewing from the bottom edge upward. Try the blouse on to determine the desired sleeve opening before sewing the sides.
Step 8: Adding Sleeves and Neckline Edge
Use Crab Stitch for sleeve edges.
Attach yarn to the underside of the sleeve.
Work SC stitches backward (Crab Stitch) around the sleeve opening.
Join with a SL ST at the end and fasten off securely.
For the neckline and bottom edges, work regular SC stitches around.
Finishing Touches
Weave in any remaining loose yarn ends using a wool needle.
Trim edges cleanly for a polished look.