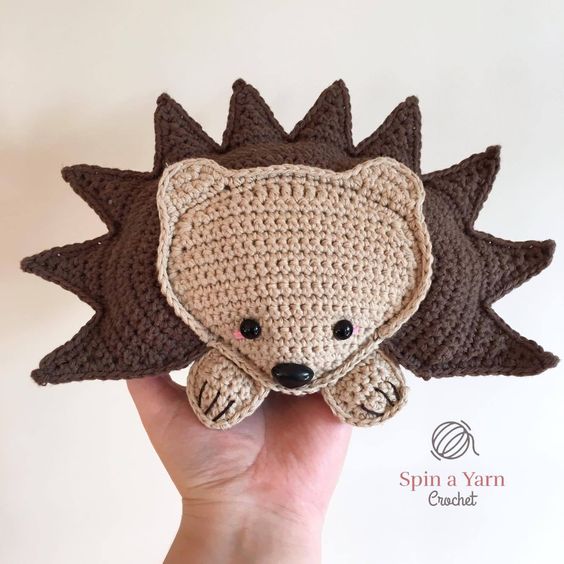
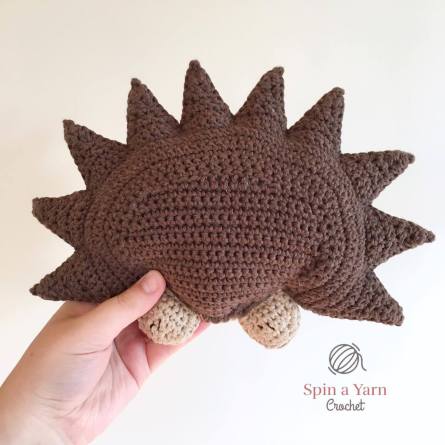
Crochet Hedgehog Amigurumi
Create Your Own Adorable Crochet Hedgehog Amigurumi! Are you looking for a fun and creative project to try your hand at crochet? Look no further than the charming world of amigurumi! One of the cutest and most popular amigurumi designs is the lovable crochet hedgehog. With its tiny size and adorable details, this little critter is sure to steal your heart. If you're searching for a crochet project that combines cuteness and creativity, look no further than the enchanting realm of amigurumi. Among the vast array of adorable designs, the crochet hedgehog amigurumi stands out as a delightful and captivating creation. With its intricate details and undeniable charm, this little hedgehog is bound to become a beloved addition to your crochet collection.
Here’s what I used:
- 3.5mm hook
- For the brown hedgehog:
- Bernat Handicrafter in Jute (less than 50g)
- Bernat Handicrafter in Warm Brown (100g)
- For the pink hedgehog:
- Loops & Threads Colorwheel in Light Coral (less than 50g);
- Loops & threads Colorwheel in Coral (100g)
- Light weight cotton yarn in pink for the cheeks;
- Dark Brown embroidery thread for the toes on the paws (I used DMC embroidery cotton);
- 10mm Safety Eyes;
- Safety nose or black crochet thread for nose
- Stuffing;
- Tapestry needle
*Ch 1 and turn at the end of each row*
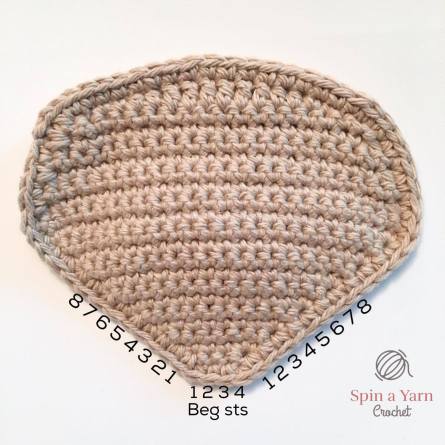
Face (make 2 panels):
The face panel will be done in Jute. The second panel (for the back) will be done in Warm Brown.
Row 1: Ch 5, sc along (4 sts)
Row 2: Inc, sc 2, inc (6 sts)
Row 3: Inc, sc 4, inc (8 sts)
Row 4: Inc, sc 6, inc (10 sts)
Row 5: Inc, sc 8, inc (12 sts)
Row 6: Inc, sc 10, inc (14 sts)
Row 7: Inc, sc 12, inc (16 sts)
Row 8: Inc, sc 14, inc (18 sts)
Row 9: Inc, sc 16, inc (20 sts)
Row 10: Inc, sc 18, inc (22 sts)
Row 11: Inc, sc 20, inc (24 sts)
Row 12: Inc, sc 22, inc (26 sts)
Row 13: Sc along (26 sts)
Row 14: Dec, sc 22, dec (24 sts)
Row 15: Sc along (24 sts)
Row 16: Dec, sc 20, dec (22 sts)
Row 17: Sc along (22 sts)
Row 18: Dec, sc 18, dec (20 sts)
Row 19: Dec, sc 16, dec (18 sts)
Row 20: Slst 2, sc 2, hdc 2, dc 6, hdc 2, sc 2, slst 2 (18 sts)
Do not tie off. Ch 1 and single crochet around the entire panel. Slst to first st. Tie off. You should have 61 stitches around the face. Repeat all of the above for your back panel in Warm Brown.
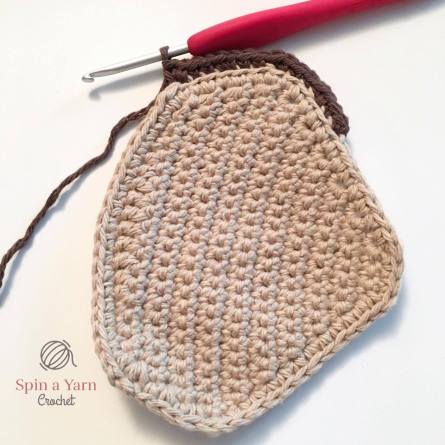
Spine Section in Warm Brown:
Locate the four beginning stitches of your hedgehog’s face. Then count eight (8) stitches up the side and join your Warm Brown yarn into the Back Loop of the 8th stitch (this does not include the four beginning stitches. Refer to the photos below if you’re unsure).

Row 1: In BLO, [sc 3, inc] ten times, sc 2, inc in last st (54 sts)
Row 2: [Sc 8, inc] across (60 sts)
Row 3: [Sc 9, inc] across (66 sts)
Row 4: Dec, sc 8, inc, [sc 10, inc] four times, sc 8, inc, dec (70 sts)
Row 5: Sc across (70 sts)
Row 6: Dec, sc 66, dec (68 sts)
Row 7: Dec, [sc 15, inc] four times, dec (70 sts)
Do not tie off. We will now do each of the individual ten spikes. The first spike and the last spike are worked the same, while the middle 8 spikes are worked a little differently. Continue to the first spike below.
First Spike in Warm Brown:
Ch 1 and turn.
Row 1: Dec, sc 5 (6 sts)
Row 2: Dec, sc 2, dec (4 sts)
Row 3: Sc along (4 sts)
Row 4: Dec twice (2 sts)
Row 5: Sc along (2 sts)
Row 6: Dec (1 st)
Row 7: Sc (1 st)
Tie off.
Count seven (7) stitches from the first spike and join your yarn in the 7th stitch.
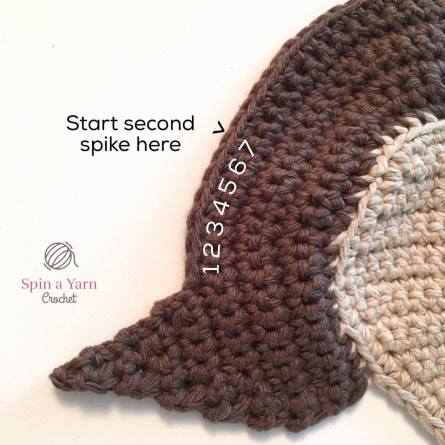
Continue to crochet the next 8 spikes as follows:
2nd to 9th Spikes in Warm Brown:
Row 1: Sc 7 (7 sts)
Row 2: Dec, sc 3, dec (5 sts)
Row 3: Dec, sc, dec (3 sts)
Row 4: Sc along (3 sts)
Row 5: Dec, sc (2 sts)
Row 6: Dec (1 st)
Row 7: Sc (1 st)
Tie off. Repeat for next 7 spikes.
For the last spike, count 7 stitches from the 9th spike that you just completed (i.e. you will join your yarn in the last stitch of the row) and continue to crochet the last spike as follows:
10th Spike in Warm Brown:
Row 1: Dec, sc 5 (6 sts)
Row 2: Dec, sc 2, dec (4 sts)
Row 3: Sc along (4 sts)
Row 4: Dec twice (2 sts)
Row 5: Sc along (2 sts)
Row 6: Dec (1 st)
Row 7: Sc (1 st)
Tie off.
Repeat all of the above for the back panel in Warm Brown. The only difference is that you do not need to crochet in the BLO for the first row of the spine section. Since it’s the back panel, you can crochet in both loops.
Ears in Jute:
Now you will crochet the ears directly into the front loops of the face panel.
For the first ear, you will count 10 stitches to the right from the middle of the face panel and join your yarn. Crochet the ear as follows:
Row 1: Sc 6 (6 sts)
Row 2: Sc along (6 sts)
Row 3: Dec, sc 2, dec (4 sts)
Row 4: Dec twice (2 sts)
Tie off.
For the second ear, you will count 4 stitches from the middle of the face panel and join your yarn. Repeat rows 1-4 above for the second ear.
Paws (make 4 panels in twos as explained below) in Jute:
Row 1: Ch 7, sc along (6 sts)
Rows 2-3: Sc along (6 sts)
Row 4: Dec, sc 2, dec (4 sts)
Row 5: Dec twice (2 sts)
Tie off.
Using Dark Brown embroidery thread, stitch three vertical lines on the paw to indicate toes. Repeat rows 1-5 for second panel. Do not tie off second panel. Put both panels together, matching up all sides. Chain 1 and sc around the entire piece. Make sure your toe stitches are facing you as you crochet around.
(Sc, ch, sc) in the corners of row 1. Stuff when you’ve crocheted about two-thirds around the piece. Slst to beginning st to close. Tie off. Repeat for second paw. Set these aside for assembly later.

Assembly:
Step 1: Eyes, Nose, and Cheeks
First thing’s first! We need to attach all of our facial features to the front panel.
After inserting the eyes, I used a light weight cotton yarn in pink to make a couple of stitches underneath each eye for the cheeks.
If you are not using a safety nose, simply stitch on a nose using black embroidery thread in an upside-down triangle shape.
Okay, here are all the pieces you should have going into Step 2.

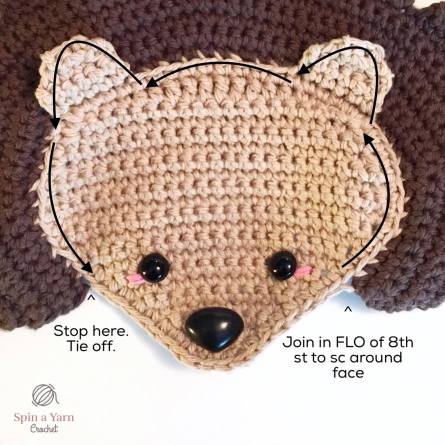
Step 2: Crocheting Around The Face
Next, you will crochet around the face panel in the front loops and around the ears to polish the edges, as well as to make the face stand out and give it more of a 3-D look.
To do this, you will join your Jute yarn in the Front Loop of the 8th stitch (the same stitch you joined the Warm Brown into for the Spine Section). Sc around the face, around each ear, and back down, stopping at the 8th st on the other side of the face.
Step 3: Body and Paws
Cut off two lengths of Jute coloured yarn about 30 cms (12 inches) long each. Put them aside for later.
Place the two body panels together, matching up all sides.
**Make sure the front of your Hedgehog is facing you as you crochet around the outside of the piece.**
Starting on the right side of the spine section (refer to below picture), begin attaching the panels together by chaining one and single crocheting around the outside of the panels in Warm Brown.

At the tip of each spike you will work the following all in the same st: (Sc, ch 3, slst in 3rd ch from hook, sc)
This creates a picot at the tip of each spike to make it extra pointy: )
Continue to crochet along all the spikes. It’ll start to feel like you’ll be crocheting spikes together for the rest of your life but hang in there; you’ll get to the end, I promise.
Stop when you get to the bottom of the last spike. Pull up a long loop and leave this for now.
Stuff your Hedgehog. The best way to do this is to push stuffing up into the tip of each spike first using the back of your crochet hook. Once all the spikes are stuffed, continue to stuff it normally.
Next, you will attach the first paw. With your tapestry needle and a length of yarn that you set aside earlier, place the paw between the panels and attach it by sewing through all three pieces; the top panel, the paw, and the bottom panel. When finished, tie a knot to secure and hide the yarn tails between the panels of the body.
Top up stuffing.
Attach the second paw the same way as the first.
Top up stuffing.
Now, picking up where you left off, continue single crocheting around the outside of the body. You will switch to Jute coloured yarn for the face. For continuity, you will want to join the Jute colour in the same stitch that you ended with when you crocheted around the face. You will want to do this when you switch back to Warm Brown on the other side of the face panel as well.
When switching colours, insert your hook into the stitch and pull up a loop in Colour A. Then, yarn over with Colour B and pull through both loops. Continue with Colour B (in this case, Jute).
When you get to the paws, simply sc in the stitches of the front panel only. Once you are past these, continue single crocheting both panels together as normal.
Switch back to Warm Brown yarn where appropriate. Close with a slst to first st. Tie off. With your tapestry needle, poke the yarn tail back inside the piece.
Here is what the back looks like!
Finishing Touches
Lastly, I did some needle sculpting to indent the eyes a little bit to add a bit of character. With a length of Jute yarn, you can do this by doing the following steps:
- Insert your tapestry needle behind Eye A (I started with the right eye, but it doesn’t matter);
- Exit the needle from behind Eye B ;
- Reinsert the needle into a different stitch behind Eye B;
- Exit the needle out the back of your Hedgehog;
- Thread the yarn tail from Eye A into your needle. Reinsert your needle into a different stitch behind Eye A.
- Exit your needle out the same stitch in the back of your Hedgehog.
- Gently tug on both yarn tails to create the sculpting.
- Tie a knot in the yarn tails and poke back inside the piece.
You made it! Enjoy your cute little Hedgehog!