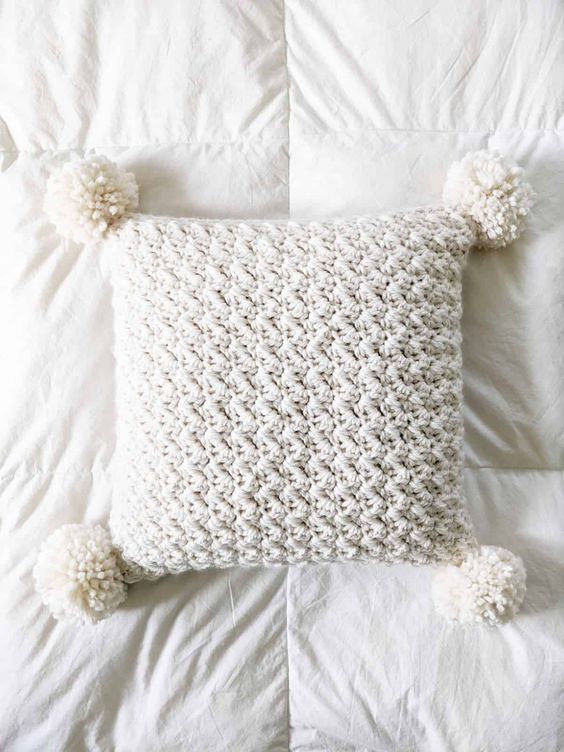
Crochet Chunky Pillow with Pom Poms
Create a cozy and stylish addition to your home decor with a handmade chunky crochet pillow featuring adorable pom poms. This DIY project is perfect for adding a touch of warmth and texture to any room in your house. By using chunky yarn and a large crochet hook, you can quickly work up this pillow cover in no time. The pom poms add a fun and playful element to the design, making it a unique and eye-catching piece. Whether you're a seasoned crocheter or just starting out, this project is perfect for all skill levels. You can customize the size and color of the pillow to match your existing decor or create a statement piece that stands out. The chunky texture of the yarn adds a luxurious feel to the pillow, while the pom poms give it a whimsical touch. This handmade pillow will not only add a pop of personality to your space but also showcase your creativity and craftsmanship.
Materials:
- 3 skeins of Lion Brand Thick & Quick in the color Fisherman (Weight 6/6oz, 106 yds), a total of 318 yards or you can use another bulky weight yarn.
- Size 10.0 mm (N) crochet hook.
- 20″ inch x 20″ inch (50 cm x 50 cm) pillow cover with zipper. I purchased a basic one from Ikea.
- Pom-Pom Maker (4 pom-poms).
- Darning Needle.
- Needle + Thread.
- Scissors.
Pillow Size:
Size is approximately 20″ inches x 20″ inches.
Gauge:
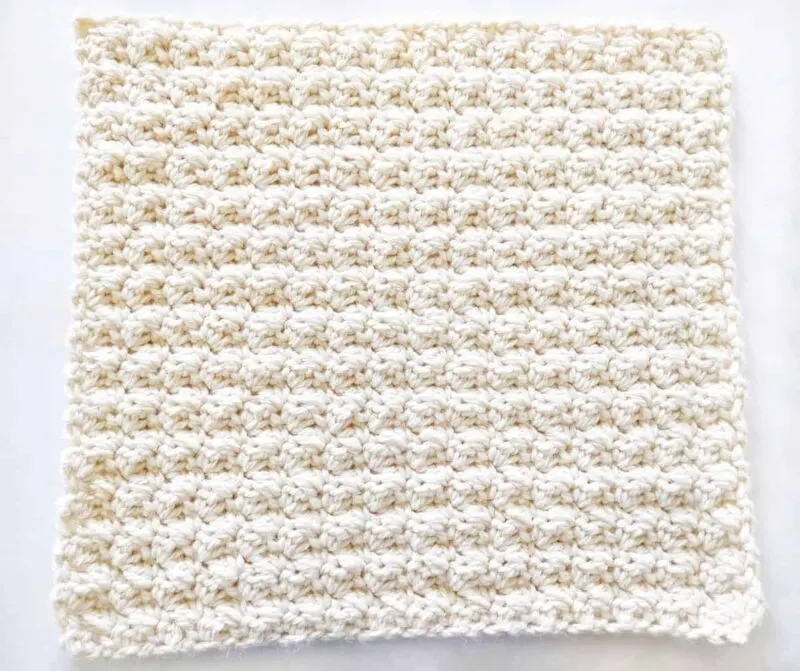
8 stitches x 8 rows = 4″inch square in Suzette Stitch.
Skill Level:
Easy
Abbreviations:
ch – chain: Yarn over, pull through loop on hook.
sc – single crochet: Insert hook into stitch, yarn over and pull through, yarn over and pull through last two loops on hook.
dc – double crochet: Yarn over, insert hook into stitch and pull through, yarn over and pull through first two loops on hook, yarn over and pull through last two loops on hook.
sts – stitch
Pattern Notes:
- Pattern written in U.S. terms.
- Ch 1 at the beginning of each row does not count as a stitch.
- You will crochet one square that measures 20″ inches x 20″ inches, and sew that onto the front of your pillow cover with needle and thread.
- If you like to practice the stitch used for the pattern, you can find a step-by-step video tutorial here.
- A tutorial on how to use a pom-pom maker can be found here.
- This pillow pattern is very customizable, for example, instead of sewing your crochet panel on a pillow cover, you can also make 2 crochet panels and sew them together using the whipstitch method.
- Total stitches for row are indicated between ( ).
Crochet Pillow Pattern
ch 34
Row 1: In second ch from hook, (1sc, 1dc) in same chain. Skip next ch, *(1sc, 1dc) in next ch, skip 1 ch. Repeat from * till last two ch. skip next ch, sc in last ch. Turn. (33)
Row 2: ch 1, (1sc, 1dc) in first stitch, skip next st. *(1sc, 1dc) in next st, skip 1 st. Repeat from * till last two st. skip next st, sc in last st. (33)
Row 3 – Row 30: Continue to repeat row 2 for the remainder of the rows.
Finish off and weave in ends.
How to Attach Crochet Panel to Pillow Cover
Now you will be sewing your crochet panel onto your pillow cover. You will need your scissors, needle, and thread for this part.
Step 1: Lay your pillow cover down first and put your crochet panel on top.

Step 2: Grab your needle + thread and starting from the corner of your pillow, insert your needle through both fabrics. Work your way around the pillow, making sure to stay on the edge of the pillow cover.
Step 3: Tie a knot when finished, and weave in the remaining thread.
Now that the crochet panel is sewn onto the pillow cover, you will now attach your pom-poms to each corner of the pillow.
How to Attach Your Pom-Poms to Your Pillow Cover
Using your pom-pom maker, make 4 pom-poms using Lion Brand Wool-Ease Thick & Quick Yarn in the color Fisherman.
When making your pom-poms, do not cut the tail end of the pom-poms. The tail end is used to tie the pom-pom to the pillow cover.
Step 1: Using your darning needle, poke two holes at the corner of your pillow. Then grab one of your pom-poms’ tail end and insert it through the darning needle.

Step 2: Thenpush your darning needle through one hole of the corner edge, and pull through. Grab your other tail end of your pom-pom and pull it through the hole as well.
Note: Both yarn strands should be on the inside of the pillow cover.
Step 3: Tie a secure knot with the tail ends on the inside of your pillow cover, and repeat steps 1-2 for the remaining corners.
You’re finished! All that’s left to do is grab your pillow and insert it into your new pillow cover.