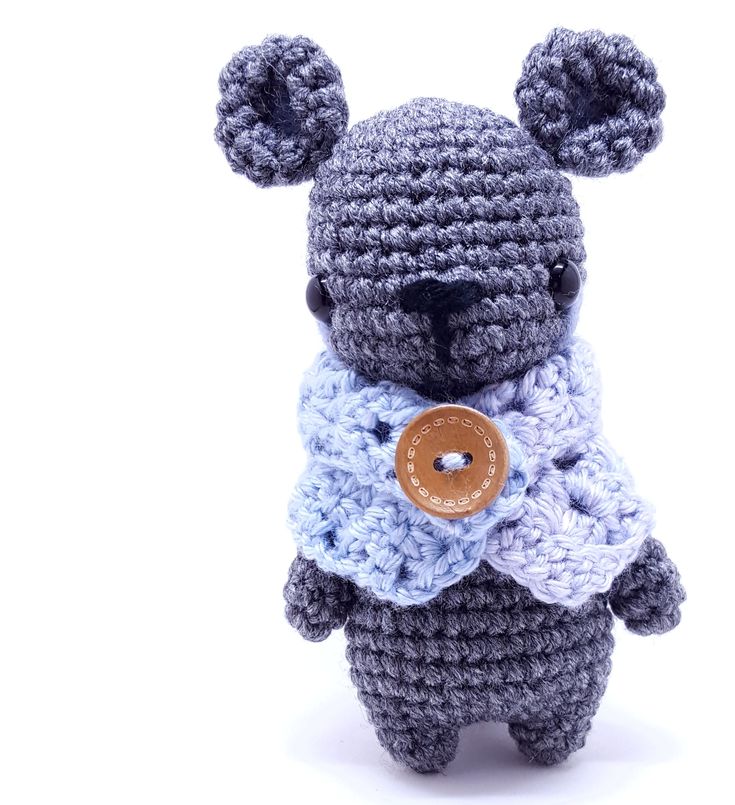
Crochet Bren Bear
Crochet Bren Bear is an adorable handmade creation that brings warmth and smiles to anyone lucky enough to snuggle with it. The intricate crochet work adds a unique touch to this lovable bear, making it a perfect companion for both children and adults alike. With its sweet expression and fuzzy texture, Crochet Bren Bear is sure to become a cherished keepsake in any home. Whether it's a gift for a loved one or a little treat for yourself, this delightful bear is guaranteed to brighten your day with its cozy charm.
Abbreviations:
MC = Magic circle
Sc = single crochet
Inc = increase, two sc in same st
Dec = decrease, two sc together
RND = round
St = stitch
Ch = chain
Sc rnd = sc in every st of the rnd
CC = Yarn color change
[…] = repeat instructions within brackets as specified.
Materials:
2.25mm crochet hook
3.50mm crochet hook for shawl
Worsted weight yarn, used Red Heart in pictures
Yarn of your choice for shawl, used worsted weight yarn for pattern provided
A small length of yarn for the nose
Yarn needle
Stitch markers
Fiber fill
Button
10 mm safety eye
Techniques:
Magic circle: Essential to the start of most amigurumi
Invisible decrease: Good for preventing gaps and giving a more uniform look to your sc’s.
Working in front lps: For my patterns I always work sc’s in the front loops of the stitch, unless otherwise specified. By working in only the front loops the sc’s will stack up straighter than if you worked them in both loops.
Stitch markers: I use a stitch marker (bobby pin) for keeping track of the beginning of my rounds, I place it in the first stitch of the round.
Staggered rounds: Staggered rounds off set the patterns inc’s or dec’s so you don’t get that pinwheel look and it is more of a circle instead of a hexagon. For example, [4 sc, inc] x6 is an even inc round that can be a staggered round, so it would become, 2 sc, inc, [4 sc, inc] x5, 2 sc, the even sc’s are split at the beginning of the round.
Close: Closing a piece is threading your yarn needle with the yarn end and putting it through each of the front loops of the last rounds’ sc’s, usually 6, and pulling tight. It should look like a mini magic circle, then put the needle through the center of it and out through the piece. Tie your knot and stuff ends back into the piece.
Whip stitch: Usually means the finished piece is folded flat with the last sc or yarn end at the edge of the piece. Thread yarn needle with yarn end, and again with only the front loops, ‘zigzag,’ or whip stitch the opening closed.
Pattern:
Head
The head ends with an opening of 18 sts that will line with the body and will be whip stitched together. Nose is added after the head has been stuffed.
RND 1: 6 sc in MC (6 sts)
RND 2: 6 inc (12 sts)
RND 3: [sc, inc] x6 (18 sts)
RND 4: sc, inc, [2 sc, inc] x5, sc (24 sts)
RND 5: [3 sc, inc] x6 (30 sts)
RND 6: 2 sc, inc [4 sc, inc] x5, 2 sc (36 sts)
RND 7-10: Four sc rnds (36 sts)
RND 11: 15 sc, 6 inc, 15 sc (42 sts)
RND 12: Sc rnd (42 sts)
RND 13: 15 sc, 6 dec, 15 sc (36 sts)
RND 14: sc, dec, [4 sc, dec] x5 (30 sts)
RND 15: 9 sc, 6 dec, 9 sc, (24 sts)
RND 16: sc, dec, [2 sc, dec] x 5, sc (18 sts)
Place eyes between rnd’s 10 and 11 about nine sts apart. Fully stuff head. Thread yarn needle with the color you wish to use for the nose and follow picture tutorial:
Pull yarn ends through to the back of the head and cut or tie.
Ears x2
The ears are folded together and whip stitched to give them a very round shape
RND 1: 6 sc in MC (6 sts)
RND 2: 6 inc (12 sts)
RND 3: [sc, inc] x6 (18 sts)
RND 4-5: Two sc rnds (18 sts)
RND 6: [sc, dec] x5 (12 sts)
Thread the tail of yarn from the ear and then fold the ear in half. Whip stitch using only the outer front lps of the folded in half ear. Attach to the head between rnd’s 4 and 5.
Body:
The body starts off with the legs, and making two of the first two rnds and joining them together.
RND 1: 6 sc in MC (6 sts)
RND 2: [sc, inc] x3 (9 sts)
Make two of these and don’t cut the yarn of the second leg instead ch 3 and join to the first leg with a sl st. Sc in same st as the sl st, this will be the first sc of the round (mark with stitch marker). Continue with eight more sc’s around the first leg, three sc’s across the chain, nine sc’s around the second leg, and three sc’s across the other side of the chain, totaling 24 sc’s around. (24 sts)
RND 3: [3 sc, inc] x6 (30 sts)
RND 4: Sc rnd (30 sts)
RND 5:2 sc, inc, [4 sc, inc] x5, 2 sc (36 sts)
RND 6-8: Three sc rnds (36 sts)
RND 9: 2 sc, dec, [4 sc, dec] x5, 2 sc (30 sts)
RND 10-11: Two sc rnds (30 sts)
RND 12: [3 sc, dec] x6 (24 sts)
RND 13-14: Two sc rnds (24 sts)
RND 15: sc, dec, [2 sc, dec] x5, sc (18 sts)
RND 16: Sc rnd (18 sts)
Fully stuff. Thread the tail of yarn from the head in a yarn needle and begin whip stitching the head and body together. Make the first stitch through the first st of the rnd on the body, this should insure that the head and body will be aligned. If that isn’t the case, start over and align the head where you want it to be and start sewing. Once done, tie the tail of yarn from the body
Arms x2
RND 1: 6 sc in MC (6 sts)
RND 2: [sc, inc] x3 (9 sts)
RND 3-5: Three sc rnds (9 sts)
RND 6: [sc, dec] x3 (6 sts)
RND 7-9: Three sc rnds (6 sts)
No need to stuff the arms, attach to the body between rnds 15 and 16.
Tail
The tail can vary in size, for this particular bear I ended up making a bigger tail unintentionally. Personally, I prefer the smaller tail, but if you want to have a bigger one, add in the extra rnd, [sc, inc] x6 after the 6 inc rnd.
RND 1: 6 sc in MC (6 sts)
RND 2: 6 inc (12 sts)
RND 3: sc ends (12 sts) (Two sc ends for bigger tail)
RND 4: [sc, dec] x4 (8 sts) (if making bigger tail, [sc, dec] x6 (12 sts)
Stuff and attach to body starting between rnd’s 5 and 6. If placed right the bear stand upright with the help if it’s tail.
The face details were done with felting, I added round markings around the eyes and put some in the center of the ears. You could even add some spots if you so desire.
Shawl
The shawl can honestly be done in any sort of crochet stitch you want as long as it comes out to be the size of a 2 x 6 1/2 in. rectangle. I ended up using one I found in, Annie’s, 100 Quick & Easy Crochet Stitches, # 84 Little Blooms with a 3.50mm hook.
Shell: (Cl, ch 3, cl)
Cluster (Cl): Holding back last lp of each st on hook, 2 dc, yo, pull through all lps on hook
Ch 11 + 3
Row 1: dc in 4th ch from hook, dc in each of the next 2 chs, [ch 1, sk next ch, dc in each stitch of next 3 chs], dc in last ch, turn.
Row 2: Ch 3, sk next dc, shell in next dc, shell in center of each dc group across, ending with a dc in last st, turn.
Row 3: Ch 3, 3 dc in ch sp of next shell, [ch 1, 3 dc in ch sp of next shell] across, dc in last st, turn
Rep rows 2 and 3 alternately till you reach 15 rows.
Weave in the starting end of the shawl and then thread the tail end. Fold the shawl 1/3 rd over and secure the folded end with a few stitches. Wrap shawl around your bear and have the two folded ends overlap each other, secure by stitching through all layers. Next take your button and thread the yarn through it. Center it how you like it then pull needle completely through bear to attach it. Tie in end.